Achievements

November 13, 2012

Scor-Pal and Hampton Art Feature Week

Hello!

Welcome to another day of Scor-Pal and Hampton Art Feature Week. Both Hampton Art and Scor-Pal designers have made some great projects, so make sure to stop by both blogs all week long. And of course there’s prizes!!

I made a super cute and easy card gift set. First the card. I started with a couple 12 x 12 sheets of Kraft cardstock to make my cardbases.

Next I placed one card in the Scor-Buddy and scored at the triangle and the one next to it.
Then I scored another line at the 3.5 line.

Next I rotated the card and scored two more lines.
 
I repeated the scoring for each card until I had 4.

Now on to some stamping!! I stamped a swirl and star in Putty ink. Next I stamped the pine tree with Olive Pastel chalk ink. I really like using this ink for tree on Kraft paper. First here’s a pic just after stamping.

And here is about 30 seconds later.

When the ink dries, the tree looks even more like a pine tree!

 Last I stamped Merry Christmas across each card.

Now we are going to make an easy envelope to hold the cards. Take a 12 x 12 sheet of cardstock and score it at 6 inches

Next score one edge at .5 inches and fold.

Next move the cardstock down so the folded edge is up against the Scor-Buddy. Then score at 5.25 inches.

Next cut your card stock .5 inches from the 5.25 score line.


 Fold the 5.25 score.

Add double sided tape along the two flaps

Next carefully fold the cardstock at the 6 inch score, so you are adhering the flaps together.

And now your cards envelopes should fit into your envelope.

I used an eyelet, button and twine to secure my card envelope. But really you can do it any way you want to.

I went on to stamp and embellish my envelope. I also added a tag so I can give it as a gift this Christmas. Here are a few shots of the card and stamped envelope.


I hope this inspires you to make a gift card set! Make sure you stop by the Scor-Pal blog and Hampton Art blog each day this week for some great inspiration and prizes!!

Dana

 Supplies:

Hampton Art Stamps: Signature Collection: Believe in Christmas SC0273, Holiday Dream Wishes SC0274 (clear stamps). Hot Fudge Studio: Holiday Tag PS0489A, PS08716, PS0715 (wood stamps).
Colorbox Ink: Dye Ink – Putty, Wicked Black. Chalk Ink – Olive Pastel
Cardstock: The Paper Studio – Kraft
Fiber: Twine – May Arts
Embellishments:  Eyelet – The Paper Studio. Button – Unknown

November 9, 2012

Hampton Art Stamps Design Team Holiday Gifts Blog Hop


Hello!

Welcome to Hampton Art Stamps DT Holiday Gift Blog Hop!! If you arrived here from Adora's blog in are in the right spot. If you are just stopping by you can start at Hampton Art Blog and make your way through the hop starting here! 

The hop will be open for the entire weekend, giving you time to visit all of the blogs. On Monday, November 12th, we will be drawing for these fantastic prizes!


In order to be entered to win the prize, simply leave a comment on each of the blogs listed blow, including the Hampton Art Stamps Blog! We will choose 2 blogs at random, and 2 comment from those blogs to win a prize.

Here is the list of Design Team Blogs:

Hampton Art Stamps Blog
Gloria Stengel
Britt Bass
Adora Concepcion
Dana Warren
Vivian Keh
Gini Cagle


Do you like to recycle or reuse packaging!?! Then this is the project for you! I remember seeing some similar ornaments, i don;t know how long ago, i couldn't;t exactly remember how they did it so i started playing around with my supplies and this is what i came up with!!

I cut a piece of cardboard from an empty shipping box and ran it through my die cutting machine. I tried this with several different dies and i found that Sizzix big thick dies worked the best for me, but you could really use any dies.


I choose a big snowflake shape (i found the bigger the die image the better) and i also die cut it from Kraft cardstock. Next i added some white paint around the edges and a little bit here or there, the idea is to give it a weathered look.

After the paint was dry i used glue to adhere some clear chunky flakes around all the edges. Set that aside to dry.

Meanwhile die cut a Kraft circle and adhere the chunky flakes around the circle. When that is dry stamp the sentiment in the center.


Last assemble the ornament. Adhere the sentiment circle to the front and embellish (i used 2 straight pins that matched the ink). Then create a loop from twine and adhere to the back, last adhere the kraft snowflake to the back.


So an easy ornament to make! Right!?!  I hope this inspires you to make some ornaments this Christmas season!

Your next stop is the VERY talented Vivian!

Dana

Supplies
Stamps: Hampton Art - Just Add Snow SC0271
Ink: Colorbox Pigment Ink - Blue
Die - Sizzix - Snowflake
Chunky Snow - Martha Stewart
Kraft: The Paper Studio
Twine: May Arts

October 27, 2012

KI Memories - Flashback Collection

Hi!

Today i have 3 cards to share, yes that is 3 cards!! If you read my blog regularly you know that i have been a bit busy the past couple months! Still am, but i do find some time to get in the craft room and i was able to get in there again a few days ago.

We got a new Hampton Art Design Team box (hopefully more about that next week!) and we got the entire KI Memories Flashback Collection. The collection includes double sided papers, washi tape, stickers, stamps and more.

What a chance to win some KI Memories goodies! Details at the end of the post!! :)

I've been playing with the Flashback stamps, washi tape and stickers, and i got my inspiration from Moxie Fab, they are having challenges this past week for Paper Crafting Tips and Tricks Week and the Flashback collection fits right in with a couple of them! (probably more, but i don;t have that much time!! lol) :)

My first 2 cards fit in with the Alphabet Sticker Challenge. The Flashback collection has a big 12 x12 sheet of alphabet stickers. I used the big multi colored alphabet stickers, and adhered a bunch of the stickers over my white cardbase and trimmed any that went over the edge.


Next i used a Polaroid sticker from the Flashback collection, adhered it to white cardstock and cut out. Then i stamped the camera image on pattern paper, cut it out and adhered it to the Polaroid with pop up dots. I stamped here's the story with black ink and cut it out. I adhered it and a 2012 sticker to the Polaroid. Last i adhered the Polaroid to the alphabet stickered cardbase.


Now i still had a few alphabet stickers left, but not enough or the right ones to make any words, so adhered all the left over alphas to a piece of cardstock and then die cut it with two shapes. Now i have 2 elements i can use later!


After this i went to throw away the used sticker sheet but i got to looking at it and i had a small part that still had the centers for the D's, O's and such, and i though what if i adhered the negative to a cardbase, it just might be usable! Turned out pretty good!!

I added 3 stripes of red Chevron washi tape to the bottom. Next i adhered white twill ribbon across the card. I stamped Oh Snap on the white ribbon. Then i stamped the camera image on white cardstock, cut it out and adhered it to my card.


My last card fits Moxie Fab's Square Punch Challenge. I made a cardbase from white cardstock and i used a square punch on the bottom right corner. I stamped the background sentiment on the inside of the card, all along the bottom.


Next i wrapped several pieces of wahi tape around black twine. Then i tore each end so they were roughly the same length. Then i adhered the banner across the card and added black twine bows.


Are you still with me!?!?!  :) Well if you that are, you are in luck! Hampton Art is having a AWESOME KI Memories Flashback Giveaway!  It is a Face off between Washi Tape and Stamps!! Click here to vote! And remember you can vote every day until Nov 1st at 8pm EST. Good Luck!!


Dana

Supplies: All supplies are from KI Memories Flashback Collection unless other wise stated.
Stamps: Click Click, Storyteller, Tick Tock
Stickers: Letterhead, Little Things
Pattern Paper: Blocks of Time
Washi Tape: Red Chevrons, Patches, Blue Skies
Ink: Ranger Distress Ink: Soot. Stazon: Black
Twine: May Arts

October 25, 2012

Papertrey Ink October Blog Hop

Hello!

It's time for Papertrey Ink's monthly Blog Hop!! For October our inspiration came from non traditional colors. PTI's blog has several photos and colors to choose from.  This is the photo that i picked:

So as i sat down and made my card, i had my idea and as i started stamping it, i realized Sweet Blush is too light of a pink, so instead i used Raspberry Fizz.


I found a stray strip of fabric and stamped a string of Christmas lights across it. I did the wire in Dark Chocolate and the lights in Raspberry Fizz, Scarlet Jewel and Ripe Avocado.

Next i stamped the flourishes in Classic Kraft ink on my Kraft cardbase. Next i die cut the Happy Day Die from Kraft and stamped the sentiment in Dark Chocolate. I lightly inked the edges of the label, then adhered it to my cardbase.


Last i adhered the fabric strip across my card and trimmed the edges.

Thanks so much for stopping by!!
Dana

Supplies:
Stamps: Papertrey Ink - Holiday Lights
Ink: Papertrey Ink - Dark Chocolate, Raspberry Fizz, Classic Kraft, Ripe Avocado, Scarlet Jewel
Kraft Cardstock - The Paper Studio
Die: Happy Day

October 23, 2012

Play Date Cafe Challenge #154

Hello!

I have a new card to share with you today and a new (to me) challenge. I've been wanting to play along for awhile now and finally had some extra time this past weekend. It is a weekly color challenge at The Play Date Cafe, the colors this week are Flame, Grape and Mulberry:


I'm using some yummy new KI Memories by Hampton Art products! You can find the Flashback line at Two Peas in a Bucket.


Once i found some ink that closely matched the challenge, i stamp out 3 clocks and cut them out. Next i adhered the washi tape across my card.


I stamped the sentiment above the tape and added a stamped arrow. Last i adhered the clocks with pop up dots. A little more graphic then i'm used to, but i like it!!

Thanks so much for stopping by!!

Dana


Supplies:
by KI Memories by Hampton Art unless otherwise specified.
Flashback Collection
Tick Tock - Stamps
Daily Flashback & Red Chevron - Washi Tape
Ink: Ranger - Dusty Concord, Fired Brick. Papertrey Ink - Enchanted Evening

October 22, 2012

CAS-ual Friday's Over the Edge

Hello!

How is everyone!! I know its been a while! I'm afraid there is a lot of Chemistry and Biology in my past and future (its taking over my life!!), but i was finally able to get in the craft room this past weekend, so over the next couple day's i'll have some new cards to share!!

It's been a long while since i have had a chance to play at CAS-ual Friday. They have had some great challenges that i wish i could have done, but with my extra time i'm finally able to do a challenge!


This weeks challenge is to have an element on your card go over the edge! And of course i made a Christmas card!! I'm going to do a quick how to and then i have to get writing a biology paper tonight! :)

I made a card from cardstock, stamped the graph in light grey ink. Then i stamped the sentiment in black ink.


Next i stamped the flowers, cut them out and added a little glitter glue to the centers. Last i adhered them to the cardbase!! Easy peasy!!! (and also the reason i like doing CAS cards!!!) :)


I'll have another card tomorrow and one on Thursday!! Gasp!! I know 3 in one week!! (thank goodness for scheduled posts!!!!)  :D

Thanks for stopping by!!

Dana

Supplies:
Stamps: Papertrey Ink: Bells & Boughs,  Desktop File
Ink: Papertrey Ink: Soft Stone, Pure Poppy, True Black
Cardstock: Papertrey Ink: Rustic Cream
Other: Stickles

October 6, 2012

World Card Making Day 2012

Click here, if you are looking for my Hampton Art/Really Reasonable Ribbon Choose Hope Blog Hop!

Hello everyone!!

HAPPY World Card Making Day!!  YAY!!!

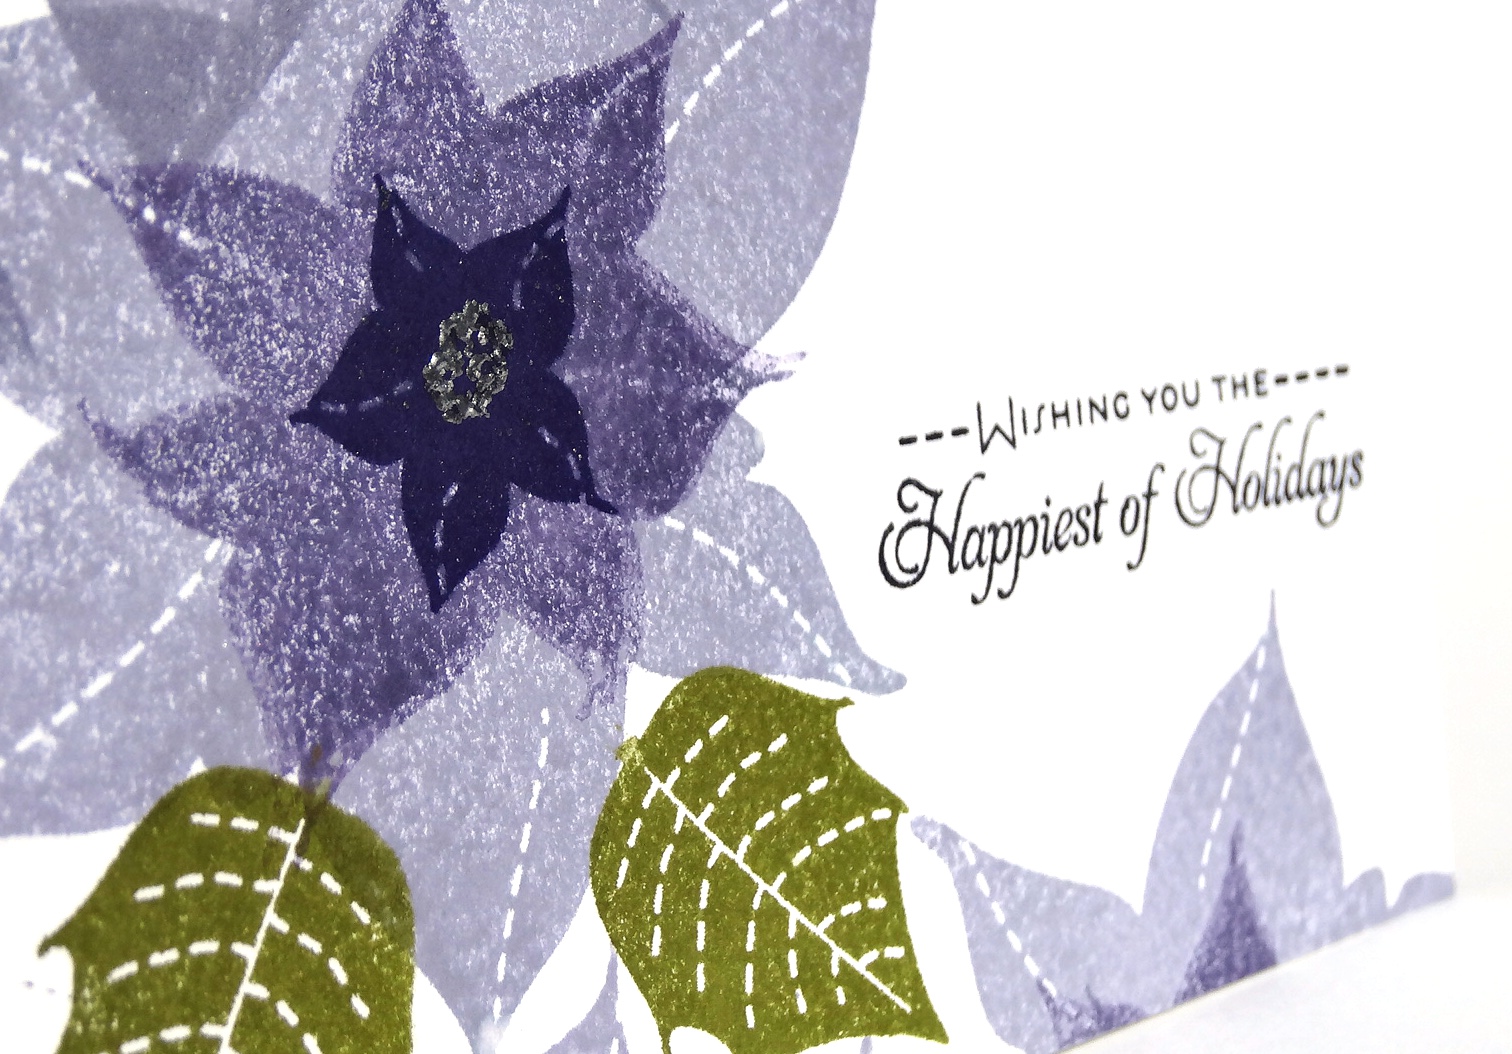
I have a one layer Christmas card to show you today!! I hope to get in the craft room later this afternoon when i get home for work. I have a birthday card and gift i have to get done, along with a zillion other things!!  lol


At first i was going to stamp the poinsettia's in pinks and reds, but then looking at all my inks, i realized i haven;t used any purple lately, after a little inking i found a combination that i liked.


To make the flowers, i started with Winter Wisteria. Then for the second layer i used Plum Pudding, but i stamped it off, then i did it again. Weird i know, but full strength was too dark and one stamp off was not enough. Last i used royal velvet.


I stamped the leaves and sentiment. Then i used watermark ink and stamped the flower centers then embossed them with sliver. Last i rounded the bottom left corner.

Thanks so much for stopping by! Have a wonderful World Card Making Day!

Dana

Supplies:
Stamps: Papertrey Ink: Christmas Poinsettia
Ink: Papertrey Ink: Royal Velvet, Plum Pudding, Winter Wisteria, Ripe Avocado. Tim Holtz Distress ink: Black Soot. Versamark.
Other: Joanns: Silver embossing powder.