Hey!
How if everyone today? I typed this up yesterday and as of then, we are supposed to get about an inch of snow today! Blahhh!! That means plants are covered and we just might break this area's record snow fall! I hope it just snows 2 inches, breaks the record then never happens again!! Ok well i guess it will happen again, later this year.... much later, i hope!! Spring is springing and i just don;t want any more snow!!!
But anyway today i'm sharing a card with you featuring The Alley Way Stamps new release stamps!! I went with a nice and bright (and springy) colors today, white and aqua!! I started with stamping the bee on watercolor paper, then masking and stamping her wings and antennae. I colored her with distress markers.
Then i used some white pigment ink and stamped several hexagons (outlines and solids). I also stamped a couple in a dark aqua color. Then i found some hexagons that surprising matched my card stock!! Yay!! I stamped the sentiment and then added the bee with foam dots!
Nice, easy and cuuute!!! Thanks for stopping by!
Dana
Supplies
Stamps: The Alley Way Stamps: Bee Unique, Bee Sweet, Bee Happy (this months free mini with $40 purchase)
Ink: Papertrey Ink: Fresh Snow, Hawaiian Shores. Versafine: Onyx Black
Hexagons: Basic Grey - Capture
Distress Markers: Squeezed Lemonade, Mustard Seed, Ripe Persimmon, Spiced Marmalade
April 15, 2014
April 13, 2014
You Make Me Smile
Hey!
Sharing a card that i made using embossing paste and embossing powder! (i know i'm kind of addicted to it!!) The card has a nice gold theme to it, which is popular right now! Though personally i only wear silver, i don't really like gold... but on my cards it looks good!!
I just did a video on how i did the background, you can click here to see it (there just might be a giveaway too but you have to hurry, it ends tonight!!) I'm not going to go into the background detail since the video covers it!
Next i stamped the bird on watercolor paper and colored her (has to be a her with those eyelashes!!) with an opaque gold marker (also used in the video). I cut her out and added her to a strip of Kraft card stock with foam dots.
I stamped the sentiment You Make Me Smile on the kraft panel. I added a small strip of black card stock to the kraft, then added it to my embossed card base.
Thanks so much for stopping by!!
Dana
Supplies
Stamps: They Alley Way Stamps - Birds of a Feather, Speak Easy
Embossing Paste: Dreamweaver
Stencil: DCWV
Embossing Powder: Stampendous
Sharing a card that i made using embossing paste and embossing powder! (i know i'm kind of addicted to it!!) The card has a nice gold theme to it, which is popular right now! Though personally i only wear silver, i don't really like gold... but on my cards it looks good!!
I just did a video on how i did the background, you can click here to see it (there just might be a giveaway too but you have to hurry, it ends tonight!!) I'm not going to go into the background detail since the video covers it!
Next i stamped the bird on watercolor paper and colored her (has to be a her with those eyelashes!!) with an opaque gold marker (also used in the video). I cut her out and added her to a strip of Kraft card stock with foam dots.
I stamped the sentiment You Make Me Smile on the kraft panel. I added a small strip of black card stock to the kraft, then added it to my embossed card base.
Thanks so much for stopping by!!
Dana
Supplies
Stamps: They Alley Way Stamps - Birds of a Feather, Speak Easy
Embossing Paste: Dreamweaver
Stencil: DCWV
Embossing Powder: Stampendous
April 12, 2014
Inktense Pencils & Copic Blender
Hi!
Today i have a card to share showing a cool technique i stumbled upon. I did a You Tube and Google search and couldn't find anyone else doing this, at least that i could see. So i thought i would do some more experimenting and eventually do a video in the future.
It all started with a card i made a couple weeks ago, i wanted a quick and easy way to color an image. It turn out so well that after i was done with that card, i made this one.
I cut a piece of watercolor paper to fit my card base and stamped the flower image a couple times on the panel (use ink that will not run with Copics). Then i just used Inktense colored pencils and lightly colored the flowers and leaves. I colored a little bit more in the places i wanted dark, but i did not color all the way to outer edge lines (the tips or edges of the flowers, etc).
Then i used the Copic Colorless Blender to spread out the pencil, it kind of acts like water, but dosen;t go as far was water would. I used to blender to soften the pencil at the darkest areas and then used it to push light color to the edges of the flowers and leafs. I went back in at a couple places with more pencil and then the blender. And that's it! Its really easy and a quick way to color!
To finish off the card i stamped the sentiment and added some sequins. Last just adhered the panel to my card base!
Please NOTE: if you try this your self, your Copic tip will stain. This dosen;t bother me, but it could bother other people. When i am done coloring with one color, i rub the Copic off on a scratch paper to get rid of any extra color, it will run clear again!
Thanks for stopping by!!
Dana
Supplies:
Stamps: Penny Black - Charming, Special Wishes
Colored Pencils: Inktense
Copic Colorless Blender
Sequins: Neat & Tangled
Ink: Memento
Today i have a card to share showing a cool technique i stumbled upon. I did a You Tube and Google search and couldn't find anyone else doing this, at least that i could see. So i thought i would do some more experimenting and eventually do a video in the future.
It all started with a card i made a couple weeks ago, i wanted a quick and easy way to color an image. It turn out so well that after i was done with that card, i made this one.
I cut a piece of watercolor paper to fit my card base and stamped the flower image a couple times on the panel (use ink that will not run with Copics). Then i just used Inktense colored pencils and lightly colored the flowers and leaves. I colored a little bit more in the places i wanted dark, but i did not color all the way to outer edge lines (the tips or edges of the flowers, etc).
Then i used the Copic Colorless Blender to spread out the pencil, it kind of acts like water, but dosen;t go as far was water would. I used to blender to soften the pencil at the darkest areas and then used it to push light color to the edges of the flowers and leafs. I went back in at a couple places with more pencil and then the blender. And that's it! Its really easy and a quick way to color!
To finish off the card i stamped the sentiment and added some sequins. Last just adhered the panel to my card base!
Please NOTE: if you try this your self, your Copic tip will stain. This dosen;t bother me, but it could bother other people. When i am done coloring with one color, i rub the Copic off on a scratch paper to get rid of any extra color, it will run clear again!
Thanks for stopping by!!
Dana
Supplies:
Stamps: Penny Black - Charming, Special Wishes
Colored Pencils: Inktense
Copic Colorless Blender
Sequins: Neat & Tangled
Ink: Memento
April 11, 2014
Purr-fect Day!
Hey there!!
Today i have a card i made for Newton's Nook Designs Inky Paws Challenge #8. Its a sketch challenge (today's the last day!):
I started by die cutting a tag from watercolor paper. I stamped the images, doing a little masking, then coloring them with distress markers. I used a very dark deep pink card base and found some stripe pink pattern paper to match.
I trimmed the pattern paper to cover the bottom half of the card base and used a scrap of Kraft paper as a border btw the card base and the pattern paper. I also die cut a banner from Kraft and stamped the sentiment in brown ink, then added it to my card base along the Kraft border.
I added some twine to the tag and adhered it to my card base with foam dots.Last i added a couple of sequins! (cuz i made a mistake that i needed to hide... i mean i wanted to from the get-go.... really! ) :D
Have a great day!!
Dana
Supplies
Stamps: Newton Nook Designs - Newton's Antics
Distress Markers: Spun Sugar, Victorian Velvet,Aged Mahogany, Pumice Stone, Antique Linen, Vintage Photo, Scattered Straw, Tea Dye
Sequins: Neat And Tangled - Festive Fall Mix
Dies: Reverse Confetti - Tag Me
Today i have a card i made for Newton's Nook Designs Inky Paws Challenge #8. Its a sketch challenge (today's the last day!):
I started by die cutting a tag from watercolor paper. I stamped the images, doing a little masking, then coloring them with distress markers. I used a very dark deep pink card base and found some stripe pink pattern paper to match.
I trimmed the pattern paper to cover the bottom half of the card base and used a scrap of Kraft paper as a border btw the card base and the pattern paper. I also die cut a banner from Kraft and stamped the sentiment in brown ink, then added it to my card base along the Kraft border.
I added some twine to the tag and adhered it to my card base with foam dots.Last i added a couple of sequins! (cuz i made a mistake that i needed to hide... i mean i wanted to from the get-go.... really! ) :D
Have a great day!!
Dana
Supplies
Stamps: Newton Nook Designs - Newton's Antics
Distress Markers: Spun Sugar, Victorian Velvet,Aged Mahogany, Pumice Stone, Antique Linen, Vintage Photo, Scattered Straw, Tea Dye
Sequins: Neat And Tangled - Festive Fall Mix
Dies: Reverse Confetti - Tag Me
April 10, 2014
Bee Happy
Hi!
I am trying to use up these random do-dad's (and boy do i have a lot!) and today i pulled out an already die cut oval to use. It went perfect with The Alley Way's new Bee Sweet stamp set! I also made this card for Seize the Sketch #17 (flipping it on its side).
It all started with a die cut oval that already had Happy die cut out of the center. I stamped the Bee sentiment just above the Happy. Then i stamped the start background from Star of the Show with watermark ink and embossed it with orange embossing powder. I rounded the corners and adhered it to my card base.
Next i stamped 3 small bees and colored them with distress markers, then cut them out. I backed my happy oval with orange card stock and trimmed off the excess. I adhered it to my card base with foam dots. Last i added the bees with foam dots.
Thanks for stopping by!!
Dana
Supplies
Stamps: The Alley Way Stamps - Star of the Show, Got It Covered, Bee Sweet
Distress Markers: Mustard Seed, Spiced Marmalade, Ripe Persimmon, Squeezed Lemonade
Embossing Powder: American Crafts - Apricot
I am trying to use up these random do-dad's (and boy do i have a lot!) and today i pulled out an already die cut oval to use. It went perfect with The Alley Way's new Bee Sweet stamp set! I also made this card for Seize the Sketch #17 (flipping it on its side).
It all started with a die cut oval that already had Happy die cut out of the center. I stamped the Bee sentiment just above the Happy. Then i stamped the start background from Star of the Show with watermark ink and embossed it with orange embossing powder. I rounded the corners and adhered it to my card base.
Next i stamped 3 small bees and colored them with distress markers, then cut them out. I backed my happy oval with orange card stock and trimmed off the excess. I adhered it to my card base with foam dots. Last i added the bees with foam dots.
Thanks for stopping by!!
Dana
Supplies
Stamps: The Alley Way Stamps - Star of the Show, Got It Covered, Bee Sweet
Distress Markers: Mustard Seed, Spiced Marmalade, Ripe Persimmon, Squeezed Lemonade
Embossing Powder: American Crafts - Apricot
April 9, 2014
The Alley Way Stamps Spring Video Blog Hop
Welcome to The Alley Way Stamps Video Hop! You should have
arrived from Christine’s blog, OR you can hop along on You Tube (links are in the videos or descriptions!) If you get lost, you can view the entire list on the TAWS Blog! The entire Hop list is below and giveaway info! :)
My technique is using embossing powder with your embossing paste and stencils! I hope you like the card and the video! (ps. i'm new to making video's, next on my agenda is to learn how to add music to my videos!!) :)
-------------------------------------------------------------------------
HOW TO WIN:
If you want the chance to win a free mini set, just hop around and watch all the videos! While you watch, keep a pen handy! We all have “Easter Eggs” in our videos that spell out a phrase. Once you know that phrase, email Chrissie at harvestmoonpapiere@gmail.com the phrase with your name and one participant will be randomly chosen to win a free mini stamp set of their choice! The hop will last through the weekend, so you have plenty of time to watch the videos and learn some new techniques. You have until 11:59 pm (Mountain Time) on April 13 to get your email in to win. The winner will be announced on the TAWS blog by Tuesday, April 15.
Supplies
Embossing Paste: Dreamweaver
Embossing Powder: Stampendous - Antique Gold
Stencil: DCWV
April 8, 2014
Sweet Babee
Hey there!!
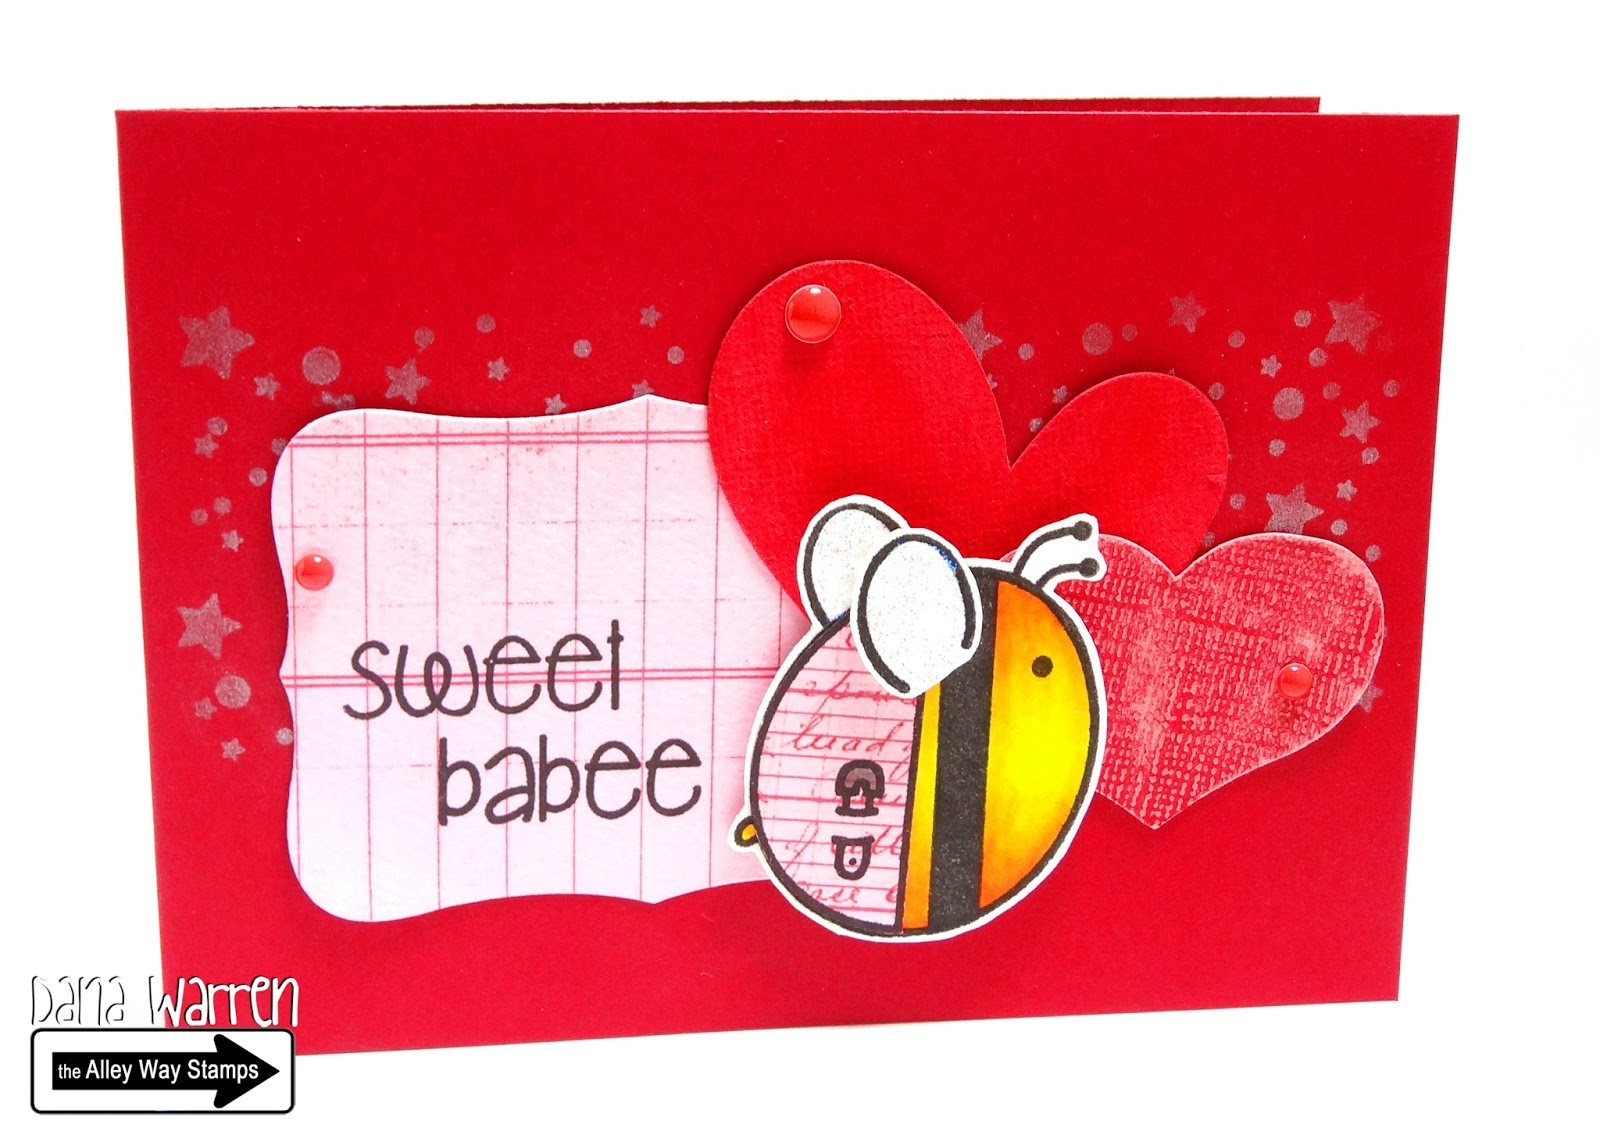
I have a sweet babee card to share today!! Yep, you see that right babee - not baby, but babee!!! We are all about the bee's this month at The Alley Way Stamps!! You will want to check these sets out! There are so many possibilities!!
I made this card for The Curtain Call Inspiration Challenge! I went with baby part of the challenge (not the colors or booties) and a girl baby or should i say a girl babee!! LOL!
I am also cleaned off my craft desk and put all my stray do-dads and extra embellishments and such all in a plastic dish. I am bound and determined to use up all these extra do-dads!! So i found a pink label, and two red hearts to use on my card.
I started with red card stock and stamped the new (and amazing) star background, Star of the Show in watermark ink. Then i added some white perfect pearls for some shimmer! I stamped the sentiment Sweet Babee on the label and added it to my card base.
Next i stamped (with some masking) the bee, then colored her in. I also stamped the little bee diaper on another label, cut that out and adhered it to the baby bee. I also added some glitter glue to the winds, but you can't really see it in my photos.
Last i added the hearts and the baby bee to the card base and added some red enamel dots!
So glad you stopped by! Tomorrow The Alley Way Stamps is having a special Video Blog Hop! Make sure you stop by to learn some techniques!! (and a little bee (hehe) told me there is a giveaway!!)
Dana
Stamps: The Alley Way Stamps - Bee Sweet, Bee Happy (this months free with $40 purchase), Bee Unique, Star of the Show
Distress Markers
Glitter Glue - Stickles
Perfect Pearls - White
Various elements from my stash
Enamel Dots - My Minds Eye
I have a sweet babee card to share today!! Yep, you see that right babee - not baby, but babee!!! We are all about the bee's this month at The Alley Way Stamps!! You will want to check these sets out! There are so many possibilities!!
I made this card for The Curtain Call Inspiration Challenge! I went with baby part of the challenge (not the colors or booties) and a girl baby or should i say a girl babee!! LOL!
I am also cleaned off my craft desk and put all my stray do-dads and extra embellishments and such all in a plastic dish. I am bound and determined to use up all these extra do-dads!! So i found a pink label, and two red hearts to use on my card.
I started with red card stock and stamped the new (and amazing) star background, Star of the Show in watermark ink. Then i added some white perfect pearls for some shimmer! I stamped the sentiment Sweet Babee on the label and added it to my card base.
Next i stamped (with some masking) the bee, then colored her in. I also stamped the little bee diaper on another label, cut that out and adhered it to the baby bee. I also added some glitter glue to the winds, but you can't really see it in my photos.
Last i added the hearts and the baby bee to the card base and added some red enamel dots!
So glad you stopped by! Tomorrow The Alley Way Stamps is having a special Video Blog Hop! Make sure you stop by to learn some techniques!! (and a little bee (hehe) told me there is a giveaway!!)
Dana
Stamps: The Alley Way Stamps - Bee Sweet, Bee Happy (this months free with $40 purchase), Bee Unique, Star of the Show
Distress Markers
Glitter Glue - Stickles
Perfect Pearls - White
Various elements from my stash
Enamel Dots - My Minds Eye
Subscribe to:
Posts (Atom)