Achievements

June 29, 2011

Challenges Galore!!

Welcome!
Today i have a card that i made for the Summer Card Camp Color Combo and PTI's Make it Monday #21 - Polaroid 2 Step Masking. This is a really fun technique, that i am sure to use again and again! For my card i decided to take the Polaroid literally and make a "polaroid" for the front of my card.


I started with a piece of Kraft cardstock and cut a piece of white scrap paper the same size. With the scrap paper i used a ruler to get my polaroid shape and cut out the inside square. Using the same technique that Nichole used in the video, i had my inside square on my Kraft cardstock and i used a piece of scrap felt and white ink to ink the white part of my polaroid. I then used the actual ink pad, to get a good white coverage.


After the ink dried, i placed the mask over the white inked part and stamped a background and a little baby onesie. I added a little white pearl just under the word Baby, on the onesie. At the bottom of the "polaroid" i stamped Happy New Baby in purple ink.


The color challenge was to use purple, pink, orange, sky blue and white. With the polaroid i got the white covered pretty good!! For the other colors i went with an orange background pattern paper, and ink the edges with white ink. Then added a pink pattern paper on top of that (edges inked too). Then a sky blue satin ribbon. I stamped the background in the polaroid blue and purple, and the onesie in purple.

Have a great day!!

Dana

Supplies
Kraft cardstock: The Paper Studio
Pattern paper: W R Memory Keepers: Family Keepsake. Kaiser Craft: Class of 87.
Ribbon: Offray
Ink: Color box, sky blue. Studio G, purple and white
Stamps: Papertrey Ink's Bitty Baby Blessings

June 26, 2011

CAS-ual Friday - Getting Edgy

Hello,

After a couple attempts i finally have a card for Casual Friday's Challenge. My first attempt went in the trash. I didn;t feel the 2nd attempt was a CAS kind of card. But i guess the 3rd time is the charm, it all came together rather quickly!


I started with 2 shades of blue and die cut scallops from both. I used the dark blue scallop and light blue negative scallop. At first i was planing on using it as a background strip, but i thought it looked like the water. I really wanted to use the little scooter that i picked up at the local scrapbook stores garage sale. Well a scooter dosen;t go on water, it would sink! :)


So i thought i would put it on a sidewalk and add green for grass. The side walk was hand drawn and cut out. I stamped the scooter in a grey ink and cut it out. I cut a small triangle from red cardstock and stamped Hi. For the flag i used a thin piece of wire to attach the flag to the back of the scooter, i adhere the scooter with pop up dots.


Thanks for stopping in!

Dana

Supplies:
Stamps: Stampin Up: Going Places. Papertrey Ink: Happy Trails.
Kraft Cardstock: The Paper Studio
Cardstock: Coredinations, and scraps
Ink: Studio G

June 25, 2011

PTI's June Blog Hop

Welcome to Papertrey Ink's June Blog Hop. This months inspirations is this photo:

June Blog Hop inspiration


A great image with lovley color and cute little girl princess dresses. Luckily i had some pretty paper with a cute little princess. I actually got the paper for the pattern on the back, not thinking i would ever use or need the princess. But luckily the princess only took up a small part so there is plenty of paper left!


I started with the princess and castle, i already cut it out when i realized i wanted to use the Mat Stack 5 die. The piece almost fit, i had to trim the top point off, as it was cut short. And the P for Princess hides the fact the paper wasn't quite long enough!


I used watercolor paper and crayons for my stripes. I trimmed it a bit, but left the natural ends of my stripes, i liked the messiness's of it. :) After trimming it i used the tiny flowers from Garden Variety to stamp and emboss a sparkly back ground.


Then i tied twine around the paper with a bow at the top left and bottom right. I stamped Happy Birthday from Gracious Vases in a dark grey. I added the princess and castle to the middle, adhering with pop up dots.


Thanks for stopping in!!

Dana

Supplies:
Stamps: Papertrey Ink: Garden Variety, Gracious Vases
Die: Papertrey Ink, Mat Stack 5
Twine:http://www.etsy.com/shop/swanandshears.
Ink: Versamark, Studio G
Embossing powder: Joann's, Iridescent Sparkle
Cardstock: Bazzill
Pattern Paper: Little Yellow Bicycle, Tiny Princess
Watercolor paper: Canson
Watercolor crayons: Caran d'Ache Sa

June 23, 2011

Make It Monday # 20 - Reverse Masking

Hello,

Make it Monday at PTI this week is Reverse Masking! I use the "normal" masking technique A LOT when i stamp. So it was fun to find some stamps that i could use with the reverse masking technique.


I used the vase from PTI's Asian Fusion. Stamped them in a row on green card stock. Then stamped it again on a scrap paper and cut the vase out. I used flowers from the same set to fill the vases, stamped in purple ink.

Then i used a glitter marker to color the centers of the flowers. For one of the middle vases, i added tiny grey rhinestones to the flowers centers and a row along the bottom of the vase. I stamped congratulations below this vase. (i am also going to enter this the Paper Crafts Gallery Idol auditions!)

I used grey card stock for my card base and a scrap of purple ribbon that matched the purple ink pretty good. And after playing with the ribbon to find the best way to use it, i came up with this border. The ribbon running horizontal is the back of the ribbon. At the corner of my folded ribbon i added a bigger grey rhinestone.

Have a great day!!

Dana

Supplies:
Stamps: Papertrey Ink: Asian Fusion, Love Birds (sentiment)
Cardstock: Bazzil
Ribbon: May Arts
Glitter Marker: Marvy, Twinklette, Black
Rhinestones: Micheal's
Ink: Memento: Black, Studio G: Purple

June 20, 2011

CAS-ual Friday: Color Block

Hi!

It's time for another Casual Friday Challenge. This week is Color Blocking. At 1st i was stumped at what to do. There a lots of way's to do color block, but nothing was coming to me, so i went ahead and worked on some entry's for the Gallery Idol and the Paper Crafts Jan/Feb call. And sure enough seeing PTI's Modern Basic set got me thinking...


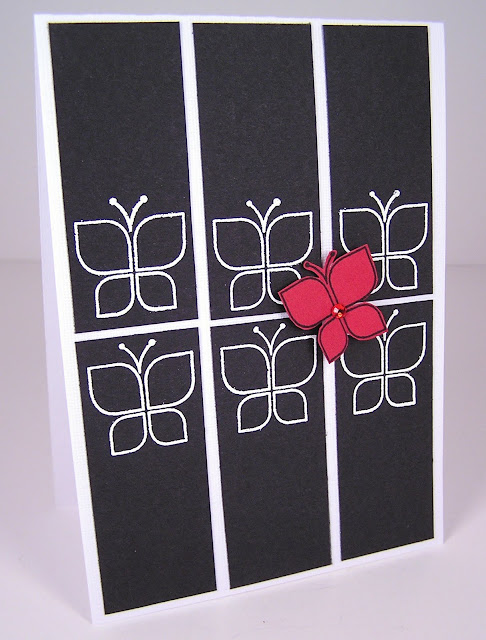
I decided to do black and white with a pop of color. I started with a white cardbase and blocked the front with long black rectangles.


Then i stamped the butterfly from Modern Basics in versamark and embossed it with white embossing powder on each block.


I stamped the butterfly once more on red cardstock with black ink and cut it out. Adhered it with a pop up dot and added a red rhinestone for some sparkle!

Thanks for stopping in!!

Dana

Supplies:
Stamps: Papertrey In: Modern Basics
Ink: Versamark, Memento, Black
Embossing powder: Inkadinkado
Rhinestone: Micheal's

June 15, 2011

Make it Monday #19 - Rock N' Roll

Hi!

So i sat down to do the new Make it Monday Rock and Roll technique at PTI .... and i found i am not very good at it! :) I tried several different inks: pigment, die, chalk. I used 2 shades of orange. But no matter what i did, i always got a stippling look when i "rolled" the stamp in ink and stamped it on my paper. But after doing it a few time's i kind of liked the look of it. So here is my take of the Rock and Roll technique!


I used PTI's button die and Modern Basics. On the button card i used several stamps from Modern basics, starting in the bottom right and working my way to the top left.


I added a orange rhinestone at the bottom right. Then i adhered the button card to the card base with pop up dots.


Thanks for visiting!

Dana

Supplies:
Stamps: PTI: Modern Basics
Dies: PTI: Button Card
Ink: Studio G, Colorbox
Rhinestone: Unknown

June 13, 2011

CAS-ual Friday's - Tic-Tac-Toe

Hello!

The Casual Friday's challenge this week is to choose 3 elements for your card, using their tic-tac-toe board. I already had this card in mind and planning to use felt and a die, so adding ribbon was easy!


For my card i started with a pink felt heart. I used a heart that i had previously cut out with my Cricut. I just traced around the heart with a black marker and cut it out. For the little heart i die cut it from the same pattern paper that i used across my card. I stamped and embossed the Love sentiment.


I found some pink and brown pattern paper in my scrap bin to match the "you" i already had die cut from brown card stock. I adhered a strip of it across my card and then added the pink/white/orange striped ribbon (overlapping the pattern paper a tiny bit).


I attached the felt heart, then the little die cut heart. And last the "you."

Thanks for stopping in!

Dana

Supplies:
Cricut machine: George & Basic Shapes cartridge
Stamps: PTI: Mixed Messages
Die: PTI: Heart Prints, Wonderful Words
Ink:  Martha Stewart
Embossing Powder: Joann's
Cardstock & Ribbon: Unknown

June 12, 2011

Father's Day Cards

Hello!!
Today i have 2 cards to share with you today. Fathers day is next week so i started my Dad's father day card early this week, knowing i would need to get it done soon to mail it on Monday. After i finished it this weekend i also did a quick card for my Grandpa.

First is a card for my dad, who has a motorcycle and goes to a lot of motorcycle meets and such. Several years ago i got a motorcycle stamp to use when i make fathers day and birthday cards for my dad. Its a challenge is to come up with different cards using this one stamp each year!

This time i used some paper with a wood pattern. I stamped the motorcycle in black ink, then added black glitter to select areas of the motorcycle. The bike was just floating out in space so i used a grey marker to add a ground for the bike. I pierced wholes along the edge and tied a black ribbon in a knot at the top.


For the bottom of the card, i used the reverse side of the pattern paper which is a crossword puzzle. I search threw out the page to find squares to fit Happy Father's Day in a readable order and would fit the card. After finding the best fit i trimmed it to fit the bottom of my card. Then i used a black sparkle marker to wright Happy Father's Day in the crossword puzzle.


For my Grandpa's card i used some cute pattern paper with cute little trucks and cars. I new this would go great with PTI's Truckin It set. And my Grandpa is a truck man! I die cut the truck from navy paper and added a white opaque pen to the windows and headlight. For the tail light i used a red sparkle marker. For the sentiment i stamped Happy Fathers Day from PTI's Father Knows Best on some white cardstock.

For the pattern paper i drew a wave in pencil then cut it out and trimmed it to fit on the front. I adhered it with pop up dots after using the white pen to add faux stitching and adhering the sentiment. With a square spellbinder's die i cut a piece of the green card stock and adhered the truck with pop up dots.

Even though it's on the cutsie side for a Grandpa, i didn;t think it was over the top cute!! And its a relatively flat so it will mail nicely!

Thanks for stopping by and have a great day!

Dana

Supplies:
Motorcycle:
Pattern Paper: Crate Paper: Emma's Shoppe Collection.
Stamp: Red Wood Mounted, Motorcycle HH0025. The manufacture is not listed on the stamp, i think i got it from Addicted to Rubber Stamps (now out of business). But i did a quick search on google and there a few online stores selling it.
Marker: PrismaColor: Warm Grey 40%. Marvy: Twinklette, Black
Ribbon: Offray, Black
Glitter Glue: Stickles, Black

Truck:
Pattern paper: Echo Park Paper: Little Boy
Stamps: PTI: Boy Basics Truckin It, Father Knows Best
Dies: PTI Truckin It, Spellbinders, Square
Pen: Sakura: Gelly Roll, White. Marvy: Twinklette, Red
Cardstock: Coredinations
Pop up dots: The Paper Studio

June 7, 2011

Make It Monday #18

Hi!

Its time for another Make It Monday at Papertrey Ink. This week is a technique with tissue paper and is very easy to do!


For my card i started with a piece of gray card stock that i glued a brown/gray tissue paper to. Then i cut the watering can and garden tools with the garden variety die. With brown ink i stamped the watering can and tools images to the die cuts.


Then i stamped a flower from the Year of Flowers Collections in a black ink and glued blue tissue paper over the flower. This toned down the stark black ink a bit. Then i added a touch of frosted blue glitter glue to the middle of each flower. When all was dried, i cut it out and adhered it to the watering can.


For the rest of the card i used a spellbinder label die and used some flower tape from Martha Stewart. Wrapped the label with twine and adhered it the cardbase. I used a small tag punch from Martha steward and stamped Grown with Love and tied it to my twine bow.

The watering can and flower i added to the front with pop up dots and adhered the garden tools next to the watering can.

Thanks for stopping by!!

Dana

Supplies:
Stamps: Papertrey Ink, Garden Variety, Year of Flowers Collection
Dies: Papertrey Ink, Garden Variety. Spellbinders, Label
Punch: Martha Stewart
Pattern paper: Martha Stewart
Tape: Martha Stewart
Ink: Memento, black. Studio G, brown
Glitter Glue: Stickles, Frosted Blue
Twine:http://www.etsy.com/shop/swanandshears

June 4, 2011

CAS-ual Fridays Callenge

Hello! So after work yesterday i checked out my favorite blogs and found lots of challenges i want to work on this weekend. Thought i would get a good night sleep and wake up ready for Saturday! 

Wrong, i couldn't sleep!! I thought for sure i would fall asleep, i was tired! So i finish reading a book, tried playing Nintendo DS... no luck, i was wide awake. So i though why lie in bed, i'll make a card!!

This is the card i made for CAS-ual Fridays challenge, which is a sketch:


I stamped a flower several times on pink pattern paper from my scrap bin and cut them out. I already had a card scored and folded, i was just going to use it to check if the size would be good, but i really liked how the pink flowers popped on the black cardstock.


I had a different idea for the scallops but it was just wasn;t working for me (and i wasn;t going to fight it at 1am!) So i just took the scalloped border i had punched and used a opaque white pen to trace the scallop border.


Then for a little sparkle and texture at the top i added black glitter dots to each scallop and some of the center dots on each flower.


I layered 3 flowers on pop up dots, and wa-la a clean and simple card .... when i was done about 1:30am, i hopped in bed and went right to sleep!!

Have a great day!!!

Dana

Supplies:
Stamps: Verve Stamps, Great Friend
Ink: Memento
Punch: Scallop border, Fiskars
Glitter Glue: Stickles
Cardstock & Pattern Paper: Unknown

June 1, 2011

Make It Monday #17

Hi and welcome to my very first post on my brand spanking new blog!! I have been thinking about starting one for some time and have finally descided to take the plunge!

The challenge this week was to use embossing to create a crackle feel to your project. I really like this technique, in fact i have a few more idea's i hope to try later this week.
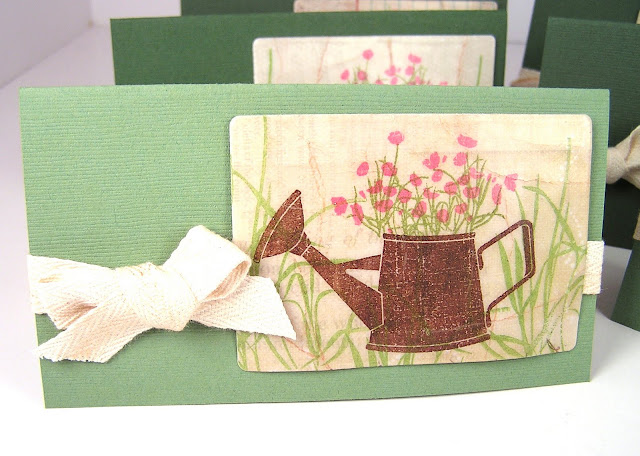
To start with i cut some pattern paper with  Papertrey Ink's Button Card die. I stamped the grass from Botanical Silhouettes set and the watering can and flowers from the Garden Variety set. And deciding to make a card set, i made 6 button cards.

Now i don;t have the super thick embossing powder so i used some regular clear powder from Hampton Arts. The 1st card i did 3 layers and it wasn't too bad, on the second i tried 4 layers. And it was a lot better, you could hear the crack when bending the card.

After cracking the button cards, i added Tim Holtz distress ink into the cracks. It worked best if i bent the card and worked the ink into the cracks, rather than lying the card flat on the table.


Next i cut some Bazzill card stock 6 x 5.5 to make small 3 x 5.5 cards. I had some cream twill ribbon and to give it a little bit of vintage/old feel to it, i used a scrap piece of felt and rubbed on some distress ink over the back and front of the ribbon. Tied the twill around the front of the card and added the watering can card to the front with pop up dots.

Thanks for looking!! :)
Dana

Supplies:
Stamps: Papertrey Ink: Botanical Silhouettes, Garden Variety
Ink: Studio G, Versa Mark, Tim Holtz: Tea Dye
Dies: Papertrey Ink: Button Card
Fibers: Unknown
Cardstock: Bazzill
Pattern paper: Basic Grey and Unknown
Other: Hampton Art: Embossing Powder, Clear