Achievements

December 31, 2013

The Alley Way January Release Blog Hop

Hi there!!

Its the day!! The Alley Way Stamps January Release!!! Next month is TAWS birthday (the celebration starts January 5th!!!, more info below!) and to help celebrate, the design team created all kinds of different party themed projects!! And it wouldn't be a proper blog hop without prizes, so keep scrolling down for the details!!

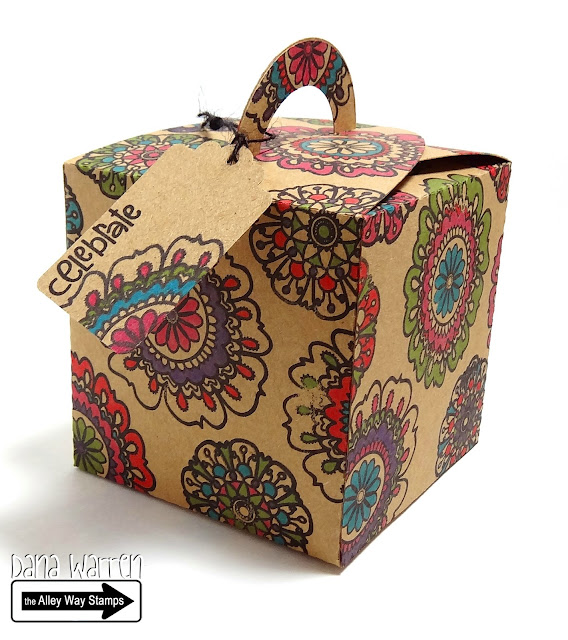
I made a little cupcake box and used the new Flower Doodles set!! I love how this turned out! As i was making it, i was thinking that this set would make for a great tween or teen birthday party! I cut the box with my silhouette, so you could even have DIY party and have guests stamp and color their own boxes!!!
Dana Warren - Kraft Paper Stamps


I used Kraft cardstock to make the box and black pigment ink to stamp the flower doodles. Because i wanted bright colors i used Memento markers to color the flowers. When everything was colored, i assembled the box!

Dana Warren - Kraft Paper Stamps


I also made a tag for the box, also stamping part of a flower. You could easily stamp your guests names on the tag or really any kind of sentiment!!

Dana Warren - Kraft Paper Stamps

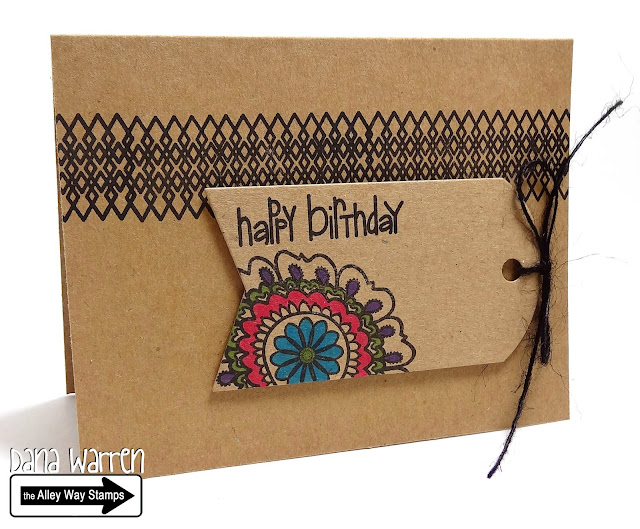
I originally cut and stamped a tag that was too big for the cupcake box, but i didn't want to loose it on my desk so i made a matching card. I also used the Bitty Borders Stamp set!

Dana Warren - Kraft Paper Stamps

Sets used Flower Doodles and Bitty Borders (available 10:00pm MST tonight!) and


---------------------------------------------------------------------

Ready for a chance to win ALL 3 NEW SETS??? All you have to do is comment on the hop! Here are the ways you can win.....

You can pick and choose which ones you want to do.... but the more you comment, the more chances you have to win!! You have until Tonight at 9:00 pm TAWS time to leave your comments!

------------------------------------------------------------------------

Once Upon a Time is FREE when you spend $40.00 or more during the month of January!! Nothing to do bu shop... this little guy will be added to your package!


Click below for the rest of the amazing Design Team!! (and don't forget to comment!!!)


-----------------------------------------------------------------------
And.... (yes this is super long post, but its worth it, lots of exciting happenings!!!) January is TAWS 3rd birthday! We will be celebrating all month long! Coupons, giveaways, and tons of inspiration!! 


Thanks so much for stopping by today!!

Dana


December 29, 2013

The Alley Way Stamps - January Sneek Peek

Hi there!!

Its release time at The Alley Way Stamps!! Today is day 2 (click here for day 1) and i have a sneak peek card to share! The stamp set is called Bitty Borders and you are going to love it!! One of my favorite things to do is to stamp patterns is stamp on pattern paper!! I really love how you can change the look of pattern paper with one stamp!!

I started by die cutting a tab from my green triangle pattern paper. I stamped one of the border stamps all over the pattern paper in brown ink. I adhered this panel to my green cardbase.

Dana Warren - Kraft Paper Stamps
Next i die cut a notebook page from pattern paper, then i stamped the border on the notebook page, but i stamped it off first. I stamped the sentiment and lips (from another new set this month!). I used a marker to add a little shading to the lips..

Dana Warren - Kraft Paper Stamps

Last i added a little wooden cloths pin so it looks like it is holding the notebook page to the file folder.

Want to win this new stamp set? Click here to visit The Alley Way blog for the details and to check out the other sneak peeks from the talented design team!!

Make sure you stop by The Alley Way blog tomorrow for more sneak peeks and on Tuesday for a chance to win all the new stamps!!

Thanks for stopping by!!

Dana

Supplies
Stamps: The Alley Way Stamps: Bitty Borders, Once Upon a Time (available 12/31/13)
Pattern Paper: Pink Paisley - Cottage Farms. Lawn Fawn - Daphne's Closet
Cloths Pin: 7 Gypsies
Ink: Papertrey Ink: Pure Poppy, Dark Chocolate
Dies: Papertrey Ink: Notebook Page, Tab

December 28, 2013

Coloring with Distress Markers

Hi there!!

I'm popping in with a card that i made with some new Christmas goodies! I got a set of new Distress Makers, so i've been in the craft room coloring up a storm!! I made 3 cards so far, today i'm sharing one and over the next couple weeks i'll share the others!!

To start with i die cut a notebook page from watercolor paper and stamped a sweet Penny Black image. I used several new colors to color the image. When i was done i matched some new pattern paper to the image. I ripped the bottom of the pattern paper and rounded the top corners.
I also found some pink Chevron washi tape that matched perfectly! I added that to the green pattern paper, along with the colored image. Last i stamped the sentiment at the bottom.


I also wanted to mention that today is The Alley Way Stamps Sneak Peek: Day 1, i'll be back tomorrow with a sneak peek for Day 2!

Also January is The Alley Way Stamps birthday, and starting January 5th we are celebrating!! More details to come!!

Thanks for stopping by!!

Dana

Supplies
Stamps: Penny Black - Big Wish. Papertrey Ink - Wishes Come True
Die: PTI - Notebook Page
Washi Tape: Queen & Co - Pink Chevron
Ink: Versafine Ink - Onyx Black

December 24, 2013

Easy One Layer Card

Hiya!

So i didn't mean to disappear there again, i was sick last week and just got back into the craft room this past weekend. My mojo was a little hit and miss as i didn;t have a lot of energy.

This is a quick card i made, just because. It was made during 'i'm tired, have no energy, but really want to something instead of sitting in front of the tv' moment!!! LOL


I wanted to play with some new stamps and new ink. I stamped the heart wreath and sentiment. Then i added a little glitter to the flowers! See... super easy, perfect when you don;t have a lot of energy!!


I hope everyone has a wonderful holiday season!!! I be back in a couple days!! (probably playing with some new crafty goodies!!)   :)

Thanks for stopping by!!

Dana

Supplies:
Stamps: WPlus9: Fresh Cut Wreath
Ink: Hero Arts & Memento
Glitter: Stickles

December 16, 2013

Happy Birthday Carol Blog Hop

Hiya!!

Long time no see!! How is everyone doing!?!? The semester is finally over and the first thing i did was get in the craft room and made a card for a super sweet and talented lady!! Today a few girls are doing a special blog hop for Carol!!! Happy Birthday Carol!!! Carol is the sweetest lady! She not only makes lovely cards, but also leaves lots of love all over blogland!  So this little blog hop is for you Carol!

I made a girly birthday card today! I didn;t really start with a plan, but i loved how it all came together!!

I first stamped several presents on watercolor paper and colored them with some distress markers. I don;t have a great selection of pinks, so they are a little pink/purple! I also stamped a banner and sentiment, then colored it with markers. Next i cut them all out.


For the background i colored a solid rectangle with the distress markers. You get a kind of sketchy look with them! Next i found a kraft circle on my desk added that and some ribbon!

To see the blog hop list click here to Bev's blog! And then stop by Carol's blog here and wish her a Happy Birthday!!

Thanks for stopping by!!

Dana

Supplies
Stamps: The Alley Way Stamps - Wish Big
Markers: Tim Holtz Distress Markers
Cardstock: PTI & The Paper Studio (Kraft)
Ribbon: Unknown

December 4, 2013

Kiss Stamping

Hi there!!

I stopping by with a super fast post!! Its the last two weeks of the semester and i am swamped this week and next, so i'm sharing a card i meant to post last week for Avery Elle's Challenge, but i forgot! So i figured i'd share it with you real quick today!! The way its looking, i'm probably not going to get into the craft room until the week of the 16th! So if i don't get to post again til then, don't worry, i'll be back eventually LOL!!

I stamped the flower on this card using the Kiss Stamping technique, inked it up with pigment ink and then pressed a background stamp on to the flower stamp. When my stamping was done, i felt it still needed something so i added a few sequins!!


Thanks for stopping by! I'll be back soon!!

Dana

Supplies
Stamps: Avery Elle - Petals and Stems. Hero Arts - Stripes of some kind.
Ink: Memento Luxe (sorry i don't remember the colors)
Sequins: Lawn Fawn - Lawn Ornaments Winter

November 27, 2013

Coloring With Distress Markers

Hello!

Today i have Christmas card that i just love!! I am entering it in Designed to Color Christmas/Winter Challenge. Its being sponsored by Penny Black, so i used a Penny Black image in my card today! I'm also posting this to Simon Says Stamp Wednesday Challenge - Anything Goes!!

I started by die cutting an oval and stamping the Mimi & Bear image. I colored her with Distress Markers (which i love, by the way!! hehe) I also used some glitter glue for the holly and the white areas of her Santa hat.
Dana Warren - Kraft Paper Stamps

For my card base i pulled out a PTI impression plate and ran it thru my Big Shot. Then i found a stripe pattern paper that matched my colored image (how that happened, i don;t know! ) I also found a vintage green button and with twine added to the stripe panel.

Dana Warren - Kraft Paper Stamps

I cut a banner from a die and stamped the Merry Christmas sentiment in black ink. I adhered the panel and banner to my card base!

To add a little shading to the polar bear i used the black shoot marker on a clear block and a bit of water (just an easy tip when coloring with Distress Markers!). This way the polar bear isn't totally white or flat looking!

Thanks so much for stopping by!!

Dana

Supplies
Stamps: Penny Black - Snow Kiss, Christmas with Mimi
Markers: Distress Markers - Various Colors
Glitter Glue - Stickles - Christmas Red, Diamond
Pattern Paper: DCWV - Home for Christmas
Impression Plate - PTI - Aida

November 24, 2013

Awesome Crafty News!!

Hiya!!

Today i have some awesome crafty news to share!!! I am so exited to announce that i have joined The Alley Way Stamps Design Team!! Yay!! I'm sure most of you are familiar with The Alley Way Stamps, if you are not (where have you been?!?! LOL) click here to check out the blog and all the other new and returning Design Team ladies!

I'll be starting with the January release but until then i made a card for you and i thought i would mention that on November 30th TAWS is having their December release and you are going to want to check it out!!

Now on to my card! Its a Christmas card (i know, big surprise, huh!). I used the Merry & Bright freebie, found here. And the heart and stitch stamps from the In Stitches set, found here.

Dana Warren - Kraft Paper Stamps

I printed the sentiment and then used a square die to cut it out. Then i stamped the heart several times on different pattern papers from a Christmas paper pad. I cut them out and adhered them around the frame.

Dana Warren - Kraft Paper Stamps

Then i used some snowflakes and sequins to dress up the hearts a bit. I used some red floss and a french knot to adhere them to my square.

Dana Warren - Kraft Paper Stamps


Next i stamped the ziz-zag stitch horizontally across my card and adhered the square with foam tape!

Thanks so much for stopping by today! I'm so looking forward to showing off The Alley Way Stamps!!

Dana

Supplies
Stamps: The Alley Way Stamps - In Stitches, Merry & Bright (freebie)
Pattern Paper: DCWV - Home for Christmas
Embellishments: Lawn Fawn - Lawn Ornaments
Floss - DMC #321
Spellbinders Square Die
Ink: Memento - Tuxedo Black

November 23, 2013

Sweet Stamp Shop - Get Bloggin'

Hi there!

Today i have my last post up on the Sweet Stamp Shop Blog! :(  I've had a wonderful time working with Nicole and all the other Ladies on the Design Team! I hope you will stop by the SSS blog today!

If you came here from the SSS blog, welcome!! I'm sharing a quick and easy card today. If you are anything like me i have lots of washi tape, so i decided to use some!! My card also features some stamps from the new Monogram It stamp set!

Dana Warren - Kraft Paper Stamps

To start with i adhered sever stripes of washi tape across the bottom portion of my card. Luckily the repeating pattern made lining up said pattern nicely!!

Dana Warren - Kraft Paper Stamps

After i trimmed off the overhang, i stamped the banner from the Monogram It set along with the Thank You sentiment. Next i pulled out my grey inks (about 4 of them) and on some extra grey cardstock i stamped a flower with each ink, then i used the one ink that matched my cardstock the best!

Dana Warren - Kraft Paper Stamps


Before i stamped flowers on my card, i stamped the banner on a post it note, cut it out and covered the banner on my card. I stamped sever flowers all around the banner. Peeled off the post it note and wa-la a lovely masked banner!

Thanks so much for stopping by!! I'll be back tomorrow with a Christmas card!!

Dana

Supplies
Stamps: Sweet Stamp Shop - Monogram It
Washi Tape - I think its Martha Steward (i've had it for awhile, hehe)
Ink: Hero Arts

November 22, 2013

Stamping on Cork

Hiya!

Today i'm stamping on cork! You can do all sorts of things with cork, my favorite is to stamp on it. And for today's card i not only stamped on it but i got all inky over it!!

I am submitting this card to The Curtain Call Inspiration Challenge. The Inspiration is the photo below. I really loved the mix of white, green and kraft in the photo!


I started with a sheet of adhesive backed cork and i inked one section of it with green pigment ink. Set that aside to dry. Next i hand cut some white cardstock to make my snowy horizon. I added glitter glue along the top edge and set that aside to dry also.
Dana Warren - Kraft Paper Stamps

Next i added some woodgrain and white chevron pattern paper to my cardbase. Then i stamped with some Liquid Pearls, yes that's correct Liquid Pearls!  I just used some extra clear acetate, added a dollup of white opal Liquid Pearls then with a small star stamp i smeared the pearls around a little. Then i cleaned my stamp, then tapped my stamp in the puddle i made and stamped it on the pattern paper. Here is a close up of what stamped Liquid Pearls looks like:

Dana Warren - Kraft Paper Stamps

Set that aside to dry (lots of drying time with this card!! lol) But by now the cork is probably read, i stamped the Christmas trees over my green cork, then cut them all out. I added my sparkly white horizon on my cardbase, then stamped my sentiment. Last i added the cut out Christmas trees! I really love how this card turned out!!

Dana Warren - Kraft Paper Stamps


Thanks so much for stopping by! I'll be back tomorrow with another card!!

Dana

Supplies
Stamps: Verve Stamps - Holiday Greetings
Ink: Memento Luxe - Pistachio
Cork: Recollections
Pattern Paper: American Crafts - Neapolitan

November 18, 2013

Using Your Brads

Hiya!

Today i have a card to share that that features Brads!! I don't know about you, but i have a ton!! I find i don't use them much, but the other day i set out to use as many as i could! I also used the current challenge at The Alley Way Stamp's Blog for my inspiration.

As you can tell in my card below i didn;t use the white of the photo, but instead was inspired by the dots. First i found a left over die cut heart and i lightly traced it twice on my pattern paper. Then with my pencil i added dots to the heart, this is where i pierced the holes. Once that was done i erased my lines and added the brads. Luckily i just had enough of  each color to make my hearts!
Dana Warren - Kraft Paper Stamps
Next i found some tan and white poka dot paper, i stamped the little bird on it and also die cut a banner from it.

Dana Warren - Kraft Paper Stamps

I stamped the sentiment on the banner. Then colored and cut out the little bird. I adhered both over the brad hearts with foam dots. Last i adhered the whole panel to my cardbase.

I hope this inspires you to use your brads!! Thanks for stopping by!!

Dana

Supplies
Stamps: The Alley Way Stamps - In Stitches. Paper Smooches - Christmas Sampler
Pattern Paper: DCWV - Home for Christmas
Die: PTI - Banners
Other: Brads

November 15, 2013

Super Fast Christmas Card

Hello!!

Today i'm sharing a super fast Christmas card with you today!! Before i get to the card i wanted to let you know that today i have a video up on the Hampton Art blog!! Yep you read that right, a video!!

Its my first one, so be kind!! LOL  I had lots of fun doing it, so i went out and got a tripod for my camera, so the orientation of my second video is a bit better!! Anyway, i hope you will check it out and let me know of any stamping technique videos you'd be interested in, i might just do one on your topic!!

Dana Warren - Kraft Paper Stamps

For my super fast Christmas card i I used some super cute Hampton Art/Jillibean goodies! These goodies are from the Christmas Cheer Chowder Collection. The Pea Pod Parts is full of colorful die cuts!! I used the snow globe die cut (which must be one my mind, this is my second snow globe in the past couple weeks! hehe).

Dana Warren - Kraft Paper Stamps

I wrapped some red and white twine around the snow globe and added a tiny ho ho ho tag, part of  the Pea Pods Parts. I used the matching Jillibean stamp set to stamp Fa-la-la-la on the snow globe base. I added a die cut heart to the globe with a foam dot. Then i added a little glitter glue to Santa's hat.

Dana Warren - Kraft Paper Stamps


I adhered the snow globe to my cardbase with foam tape. And last added faux stitching around the cardbase's edge.

Thanks so much for stopping by! I hope this card inspires you to pull out those die cuts and make a quick and easy card! And make sure you check out my 1st ever tutorial video on Hampton Art's Blog!!

Dana

Supplies
Stamps: Hampton Art - Jillibean - Christmas Cheer Chowder JB0143
Pea Pod Parts - Jillibean - Christmas Cheer Chowder JB0138
Twine
Glitter Glue: Stickles - Diamond
White Pen - Gelly Roll

November 14, 2013

Sweet Stamp Shop - November Release

Hello everyone!!

Its Release day at Sweet Stamp Shop!!! Yay!!! There are amazing new stamps that i know you will want to your hands on!! The Sweet Stamp Shop has 3 new stamp sets AND a new set by SSS's Alyssa Bennett called Yummy Friends! You are going to want to see what the amazing design team has for you, you can click here for the Sweet Stamp Shop's Blog!

The first stamp set that i am featuring is the Monogram Alpha set!


This an awesome alphabet set! The letters are tall and skinny! I started by spelling out I Love U on my clear block. With a ruler i traced a pencil line where i wanted the sentiment i made to go. I stamped I Love U in red ink.

I set that aside and then randomly added letters to a 3 other clear blocks. I stamped them in black ink around the I Love U sentiment. Next i mixed up the alpha's again and stamped again until the remaining cardstock was stamped.


Last i added the fabulous SSS flair that says Just Sayin'!

-----------------------------------------------------

The next set is Monogram It!! (i think this is my favorite!! There are sooo many possibilities!!)


To start i stamped and embossed the deer with green embossing powder. No matter what embossing powder i use, i usually get dimples in the melted powder, soo i use a watermark pen and mark those dimples, add more embossing powder and melt again! And wa-la a nice smooth embossed image!!


Next i stamped the flower wreath around the deer. However, this is not the real size of the wreath, its actually too big to go around the deer, so instead i cut the stamp (yep cut it!! Don;t worry it dosen;t hurt!) I was able then to make the wreath smaller by taking out a small piece. I added a little purple glitter glue and liquid pearls to the wreath.


I stamped the sentiment and the arrows accross my cardstock. Then i cut away the top part of my card stock and around the deer and wreath. I placed some wood grain and white zig-zag pattern paper on my cardbase and added my deer panel with foam dots. :)

-----------------------------------------------------------


Next i used the same wreath as above, only i put back the part i cut out (see you can't even tell!!) This is a really easy technique, i'm sure there are a lot of videos and tutorials online, but in case this is new for you, here's a quick run down!

  1. Stamp your images on tissue paper. Use pigment ink, as dye ink soaks into the tissue paper and blurs your image. I have also colored images with watercolors and a tiny bit of water, just emboss your image first to help keep your watercolors in line!
  2. Cut out your image. You want to get as close as you can, the less tissue paper the better. If you have multiple images/sentiments i suggest having each piece connected by a thin strip of tissue paper, it will be a lot easier to place on your candle! No stray pieces floating away!!
  3. Place the stamped tissue paper on the candle then cover with wax paper. You want the wax paper to cover the candle and you want long ends so you can place the wax paper over the image and can grasp the ends on the 'back' side of the candle. You want it to be taunt and smooth, but not too tight!
  4. Heat the image. You can see the tissue melting into the candle, as the white from the tissue paper disappears, you want to move on as soon as the tissue paper is 'gone.' With a little practice you will get the hang of it!! You can also use any color of candle!! The white tissue melts into the candle so you don;t see the tissue paper, just the image!
  5. Enjoy!

I used some orange pigment ink for the wreath (orange is my favorite color) and black pigment ink for the letters from the Monogram Alpha set.


-------------------------------------------------------------------------

The last new set this month is the Panda Face set! Isn't it cute!?!?!


 This card started with some cool blue ombre pattern paper, i trimmed it and added it to my Kraft cardbase. I also used some wood grain pattern paper from the same pad. I used some letters from the Monogram Alpha set, a sentiment from the Panda Face set, plus a couple words from older SSS stamp sets!! I used all these to make my own sentiment: I'm sad I Missed your Birthday.

Next i stamped and cut out the cute little panda. I used the sad mouth on the little panda, this set has a smile, frown, oh, and 2 meh kind of faces! I added the little panda to my card base, along with some blue enamel dots.


------------------------------------------

Do you love these sets as much as i do!??!  Check out the Sweet Stamp Shop Blog for tons more inspiration AND the new stamp set from Alyssa Bennett!!

Use code NRN20 to get 20% off the new release!! It ends 11/15 so act fast!! :)

Thanks so much for stopping by and check back tomorrow! I have something a little different to share with you tomorrow!!

Dana

Supplies

I Love U
Stamps: Sweet Stamp Shop - Monogram Alpha
Flair: Sweet Stamp Shop - Just Sayin'
Ink: Papertrey Ink - Pure Poppy, Smokey Shadow

Hello Greetings
Stamps: Sweet Stamp Shop - Monogram It
Embossing Powder: Stampdenous - Jade
Ink: Papertrey Ink - Winter Wisteria, New Leaf
Glitter Glue - Stickles & Liquid Pearl
Pattern Paper: Recollections - Dear Lizzy - Neapolitan

DRW Candles
Stamps: Sweet Stamp Shop - Monogram It, Monogram Alpha
Ink: Colorbox - Orange. Memento Luxe - Tuxedo Black
Tissue Paper
White Candles
Wax Paper

I'm Sad
Stamps: Sweet Stamp Shop - Panda Face, Monogram Alpha, Admit One, Wheely Like You
Ink: Papertrey Ink - Dark Chocolate
Enamel Dots: My Minds Eye
Pattern Paper: Dapper Dan