Achievements

September 30, 2013

Sweet Stamp Shop Use What You Have Challenge #17

Hey there everyone!!

I popping in to share a quick card today! I got called into work to cover a shift this morning, so i have to make this quick so i can start on some Genetics homework :/


I'm submitting this card to Sweet Stamp Shop's Use What you Have Challenge #17!! You have until tomorrow night to join in!! And what is so sweet about this challenge, you might ask! You just have to use something in your stash! We all have them, so what better way to use some of it up?

So here is my stash! A sticker sheet and some pattern paper scraps.


And here is my card! I used the pattern paper on the other side of the scraps pictured above. I stamped Sweet Stamp Shop's Jars onto watercolor paper and used some distress markers to color them in. I then cut them out.


I used a sticker tab and added it to my pattern paper with a staple. Added a tiny little sticker to one of my jars. Then i used a pattern paper strip and adhered it to my cardbase and last adhered the jars!


Thanks so much for stopping by! I hope you'll play along!!

Dana

Supplies
Stamps: Sweet Stamp Shop - Jars of Sweets
Markers: Ranger Distress Markers
Sticker Sheet and pattern paper: Authentique

September 28, 2013

AHHH HA!! Genius!!

Hey there!!

Today i have a new Get Bloggin post on the Sweet Stamp Shop Blog! Make sure you check it out for some great tips for Banner's and Layout/Design! If you are here from SSS blog, welcome!!

The card i made for the post was super easy! To make my star mask, i used Post It! full adhesive notes. The star is too big for one post it note, so i placed sever on a piece of cardstock, then used scotch tape on all the seams. Then i cut out the star, and carefully pulled the post it note star off the cardstock star.


I placed the post it star on my cardbase and used some 3 shades of yellow/orange ink and inked around the star. When i was done, i carefully pulled off the post it star.

Last i stamped the sentiment in black ink and adhered a few white sequins!! Pretty cool, huh! Bet know your looking at your dies in a whole new light!! :)


I'll be back in a couple days with another card for Sweet Stamp Shop's Use What You Have Challenge #17! Click here to check out the challenge!!

Thanks for stopping by!!

Dana

Supplies:
Stamp: Sweet Stamp Shop - Chemistry
Ink: Papertrey Ink - Lemon Tart, Summer Sunrise, Harvest Gold
Sequins: Lawn Fawn - Lawn Ornaments

September 27, 2013

Card Making Manual - Results & Winner

Hello everyone!

I have the results from my Card Making Manual and the winner of the giveaway! First the results! I had a total of 57 people complete the survey, which is awesome!!! I told my mom, i'll like only get 12 responses! Thank you so much for taking the time to complete it!! It really helped in determining what goes in my Card Making Manual.

The Results:
Age Range Sex How long have you been card making?
16-19 2% Male 2% 1-2 Years 19%
20-29 11% Female  98% 3-5 Years 19%
30-39 21% 5-9 Years 23%
40-49 13% 10+ Years 39%
50-59 10%
60+ 6%
How did you start card making? What resources did you use when learning about card making?
Friend/Family 34% Books 33%
Magazine 7% Magazines 65%
Online/Blogs 12% Blogs 47%
Local Scrapbooking Store 12% Videos 37%
Scrapbooked First 34% Internet 35%
Classes 42%
Other 14%
Do you primarily use Stamps or Scrapbook elements on your cards? Do you also scrapbooks?
Stamps (mostly) 35% Yes 65%
Scrapbook elements (mostly) 4% No 35%
Mix of both 61%
Do you then/now participate in other crafts?
Yes 88%
No 12%


The hardest techniques to learn was coloring, followed by masking and designing. The easiest technique was stamping, then embossing and die cutting.

The results of the survey show that Design, Stamping and technique information was the most frustrating things about card making. The easiest included die cutting and pattern papers. And the majority of people wanted to see techniques in the perfect Card Making Manual, followed by pictures and step by step instructions and design principles.

I really appreciate everyone who took the time to complete my Card Making Manual Survey! It has really helped me decide on the best layout and content for my manual.

Now on to the winner of my Giveaway! I used Random.org to find the winner:
The winner is Miriam Prantner!!  Yeah!!! I will get your box of goodies in the mail today!

Thanks again everyone!!!  Oh and make sure you stop by tomorrow! It's my day on the Sweet Stamp Shop Blog!

Dana

September 18, 2013

Give Thanks

Hi everyone!!

Today i have a quick card to share! I can tell already its going to be a busy semester!! I took a break from the school work and started making DT cards along with a quick card to share today!

I also wanted to remind everyone that tomorrow is the last day to take my Card Making Survey. If you haven't taken it yet, i would appreciate if you would take a couple minutes to complete it. Its only 12 questions and leave a comment on the page for a chance to win a few card making goodies! Click here to get the details and take the survey!

Ok, on to my card! This card was a quick to do up! I inked up the feathers from Sweet Stamp Shop Fall Gratitude set with distress ink and then lightly spritz it with pearlized water.

Kraft Paper Stamps - Give Thanks

I stamped the feathers (be quick, its a fairly detailed stamp and you want some of that detail) and then let it dry. Then i stamped the sentiment and added a few enamel dots.

Kraft Paper Stamps - Give Thanks

And that's it!! LOL

Thanks so much for stopping by!!

Dana

Supplies
Stamps: Sweet Stamp Shop - Fall Gratitude
Ink: Distress Ink - Mustard Seed, Spiced Marmalade. PTI - Dark Chocolate
Enamel dots: My Mines Eye

September 13, 2013

Get Bloggin' with Sweet Stamp Shop

Hello everyone!!

It's my day on the Sweet Stamp Shop Blog!! If you headed over here from SSS, thanks for stopping by!! My posts on the SSS blog will be about.... wait for it..... Blogging!!! And today i kick it off with photos!!!

So please check it out and let me know what you think!!!

Here on my blog i'm showing the card that i made for that post. The idea withe twine and bows came to me first! I cut a pane from card stock then,I used a ruler to mark 4 notches, then with a ruler sketched a straight line across the panel. I punched a small hole at each notch.


Then i threaded the twine and tied a small bow (repeat 3 times). I moved the bows down and got as close as i could to the holes i punched!


I found a heart in my stash here:


Then i stamped the sentiment 'because we're' from the Perfect Match set and 'amazing' from the Admit One set on the heart. I then adhered the heart to the twine panel with foam dots and then adhered the panel to my cardbase with foam dots.


Since i used a heart from my stash i am also participating in Sweet Stamp Shops Use What You Have Challenge # 16!!! Its fun to play and there's a give-a-way!!!

And speaking of give-a-ways!! I also have one on my blog for taking a quick survey about your card making!! Click HERE to check out the survey and the give-a-way!! I hope you take it (its not long!)!!

Thanks for stopping by!!!

Dana

Supplies:
Stamps: Sweet Stamp Shop - Admit One & Perfect Match
Twine: May Arts
Heart: A Silhouette file cut sometime in the past (it was an extra)!!

September 12, 2013

I'm Nuts....

Hello Everyone!!

Today i have a quick card to share with you! This one i made several weeks ago, but now just got around to posting it!! (i've been super busy!)  I also have a little favor to ask of you, more info is below (it involves a chance for free stuff!!!) !!!

Anyway this card all started with the washi tape that is running along the bottom of the card! I found it at the grocery store in the office supply department! To me it looks like circuits! And what goes best with circuits??? Robots!!!!

However i didn't have any robot stamps!! So yes, i went and ordered some..... to go with some washi tape..... Really i'm not nuts!!! LOL


So i stamped the robot and the nuts and bolts, colored him with some water and distress markers. Then i cut them all out and adhered them to my cardbase with foam tape. I stamped part of the sentiment on the front.


And another part of the sentiment on the inside.

Ok so now on to the free stuff!! I have a very big favor to ask of you!! I am currently taking 3 college courses, one being Technical Writing II. As part of the semester long project i have to make and collect survey information!! So i created a survey with some free online software and made a special page just for it! The page has all the details, along with the give-a-way info!! I would be sooo appreciative if you would take a little time to complete it! (its not long!)  Click here for my special page (its also at the top, just under my blog header)

THANK YOU so much!!!

Dana

Supplies
Stamps: Alley Way Stamps - Lighter Then Air
Distress Markers: Black Soot, Barn Door
Washi Tape: Scotch Tape

September 10, 2013

Sweet Stamp Shop - September Release

Hi there!!!  Its HERE!!! Sweet Stamp Shop September Release!!! We have 3 new awesome stamp sets!!! Make sure you stop by Sweet Stamp Shop's Blog to see all the awesome projects from the Design Team!!


--------------------------------------------

First up a card i made with Super Mom! I just love this set!! It has soooo many possibilities!! I am still getting ideas for other cards!!

I found an older Fancy Pants collections that had nice primary colors. The super M is embossed and colored with markers. I stamped the sentiment on a die cut talk bubble, but cut off the pointed end. Last i added a few sequins!


----------------------------------------------------

Yep another card made with Super Mom! I stamped and embossed the bam! bubble as i like to call it!! lol  Then i stamped, colored and cut out the bomb (i also added a little bit of glitter glue to the white part of the bomb). I adhered the bam! bubble and the bomb with foam dots. Then stamped the sentiment above and below.


--------------------------------------------------

Next up is Made by #2, another great stamp set!!! I stamped the pin wheel from the Wheely Like You set twice onto pattern paper, once on a tiny text pattern and again on a pink pattern paper. I used some water and Black Soot Distress marker to add some shading to the text paper. Cut out the pink part and adhered it to the text pin wheel. I adhered some washi tape across my cardstock. Last i masked and stamped part of the sentiment above the washi tape, then again below the washi tape!!


---------------------------------------------------

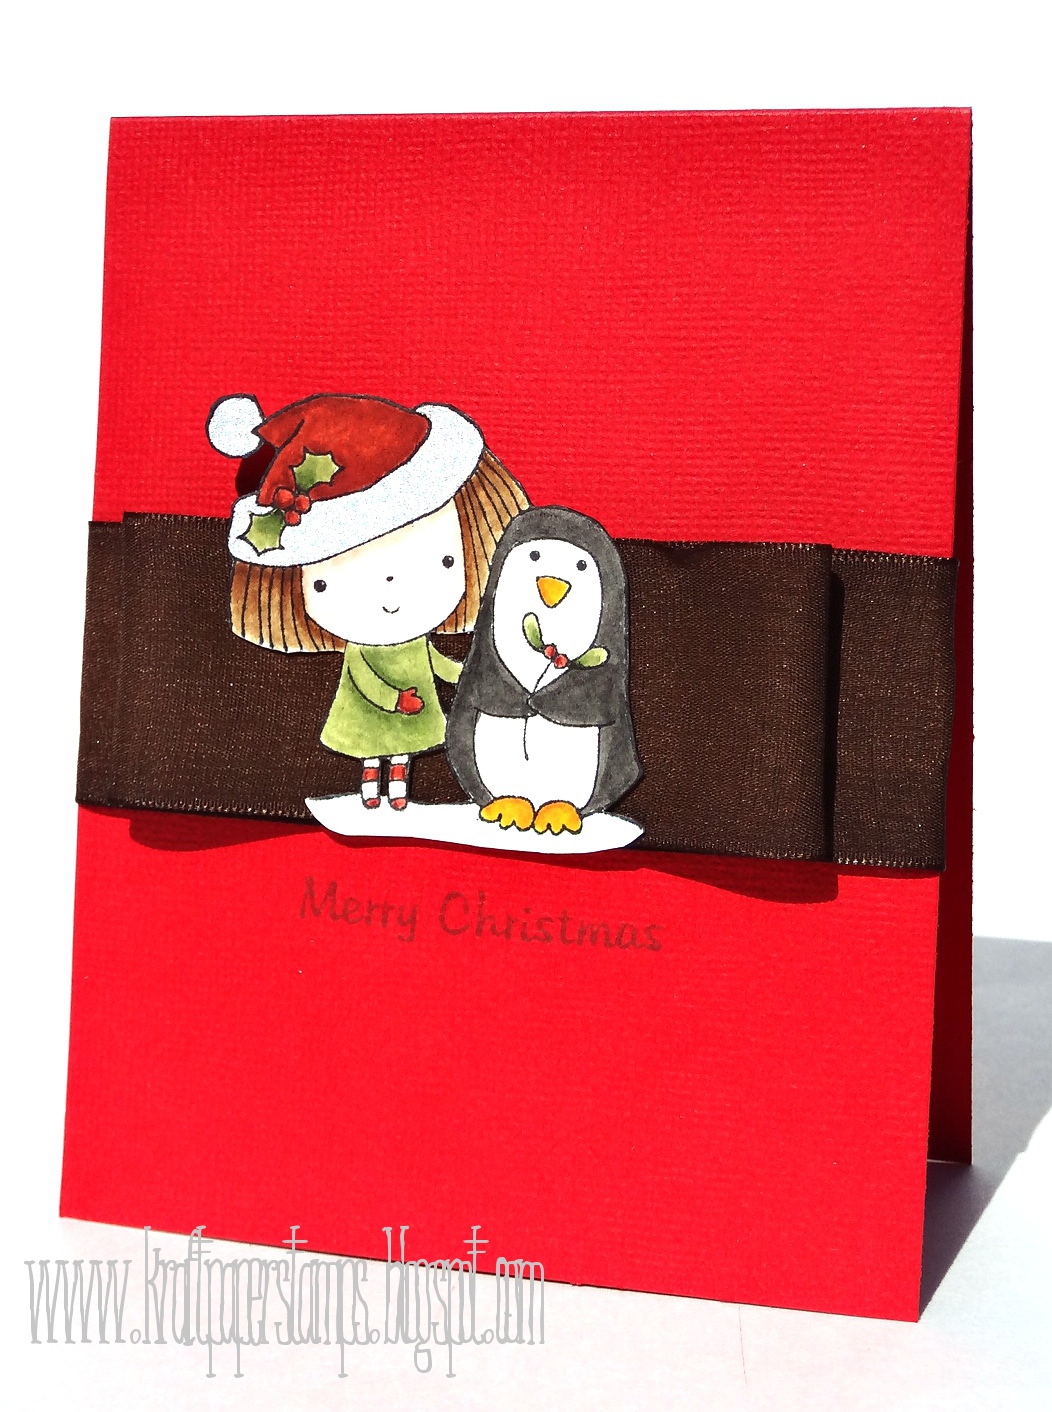
For my last project i made up a ornament card set. I used some scrap papers and my silhouette to make the Santa's. I added twine at the top and with basic Scotch tape adhered the twine to the inside of the card, this way the Santa is also a part of your card and an ornament for the tree!! I stamped Merry Christmas from Holiday Sentiments at the bottom of the card.

As you can see from my pictures i cut some tiny tags and stamped the sentiment Store Bought?!?! I Think Not, from the new Made by #2 set. I wrapped the cards up with twine and added the tag to the front, perfect for gift giving!!

Oh and i almost forgot i added to and from (from Jars of Sweets set) to the back of my tags. And i used the Totally Homemade sentiment on the back of each ornament.


Are you still with me?!?! Long post i know, but i had so much FUN suing these stamps, i couldn't just stop at one card each!!! 

SSS is offering an amazing coupon just for the release !! Use coupon code NRS25 to get 25% of this months NEW stamps!!

Please make sure you visit Sweet Stamp Shop's Blog for all the other wonderful designers projects today!! You don;t want to miss it!!

Have a great day!!!

Dana

Supplies:

Super Hero
Stamps: Sweet Stamp Shop - Super Mom
Markers: Memento - Lady Bug, Danube Blue, Cantaloupe, Rhubarb Stalk, Dandelion
Pattern paper & Embellishment: Fancy Pants - To The Moon
Die: Simon Says Stamp - Talk Bubble

You're the Bomb Mom
Stamps: Sweet Stamp Shop - Super Mom
Distress Markers: Spun Sugar, Black Soot, Mustard Seed, Wild Honey, Spiced Marmalade
Embossing Powder: Adirondack - Cranberry
Ink: Memento - Tuxedo Black. Versamark
Glitter Glue: Stickles - Diamond

I Made This Card!!
Stamps: Sweet Stamp Shop - Made by #2, Wheely Like You
Pattern Paper: Authentique - Essentials Collection
Washi Tape: Scotch Decorative Masking Tape - Mint Mosaic
Ink: Ranger Archival Ink - Jet Black
Distress Marker: Ranger Black Soot

Merry Christmas
Stamps: Sweet Stamps Shop - Made by #2, Holiday Sentiments
Ink: Distress - Frayed Burlap
Silhouette File: Gnome and mushroom - Pebbles in my Pocket
Kraft Card & Envelopes: Canvas
Twine: May Arts

September 6, 2013

Merry Christmas


Hi!!

Today i have a quick post to share!! I have a BUSY weekend and week ahead so this is going to be sort and sweet!!  I made this card a few days ago for Less is More Challenge: Use a Rubber Stamp! Well i used a clear stamp!! I wanted to make a Christmas card and the only Penny Black Christmas stamps i have are clear!

I stamped the image and used Distress markers to color it. Cut it out and added some glitter glue to the hat.


Then i wrapped some brown ribbon around my cardbase, making an flat elegant bow. I adhered my colored image to the center. And last stamped the sentiment in brown below the ribbon.

Thanks so much for stopping by! Make sure you stop by on Tuesday, its Release day at Sweet Stamp Shop!!! 3 new stamp sets and tons of inspiration!!


Oh aaaannnd visit there facebook page for a giveaway now through Saturday!!

Dana

Supplies
Stamps: Penny Black - Christmas with Mimi
Distress Markers: Shabby Shutters, Forest Moss, Peeled Paint, Spiced Marmalade, Tumbled Glass, Barn Door, Fired Brick, Black Soot, Vintage Photo, Mustard Seed, Tattered Rose
Ink: Ranger Archival Jet Black
Glitter Glue: Ranger - Diamond

September 3, 2013

Exciting News!!!!

Hello everyone!!!

Today i have exciting news that has been sooo hard not to spill!!! I'm happy to say that i am one of several ladies on the Sweet Stamp Shop Fall Design Team!!! I am sooo looking forward to sharing some awesome new and old stamping goodness with you over the next few months!!
                                            
To celebrate i made a card with some yummy Sweet Stamp Shop stamps! I came up with the idea in the shower!! LOL It started with when i saw the challenge at CAS-ual Friday's: Kraft and Text.
I started with using a ruler and pencil and made two lines, then i stamped letters from Alpha Tab to spell out Happy Birthda. The lines were a guide, i didn't want them perfect since i was going to add legs and surely letters with legs wouldn;t stay still!! Next i stamped the Y a little bit lower and off to the side.


I drew in some legs on the letters and added 'quit your lolly gaggin' Y!! Then i stamped the balloons from Admit One set on my cardbase and again on some watercolor paper. I colored the balloons with Distress Markers and cut them out. I then adhered them to my cardbase with foam dots!


Thanks soo much for stopping by!! I can't wait to share some Sweet cards with you!!! The next release is Tuesday and there are some new AWESOME stamps!!! Click here to check out their shop and here to visit there Facebook page!!

Have a great day!!!

Dana

Supplies:
Stamps: Sweet Stamp Shop - Admit One, Alpha Tabs
Ink: Memento - Tuxedo Black
Distress Markers: Faded Jeans, Stormy Sky, Tumbled Glass, Forest Moss, Peeled Paint, Shabby Shutters, Fired Brick, Barn Door, Worn Lipstick, Black Soot.

September 1, 2013

Sleep is Good


Good Morning!!!

Today i have a card for CAS-ology Book Challenge, i'm just getting it in under the wire!! As soon as i saw the challenge i new i wanted to use this bookshelf background stamp! Does a busy background make a CAS card?  No white space, but a it is a simple card!!


I stamped the background stamp on my cardbase. Then i die cut the banner and stamped the sentiment in red ink.


Next i pressed wood hearts into red ink. I adhered the banner and hearts to the cardbase.

Thanks for stopping by!!

Dana

Supplies
Stamps: Impression Obsession - Bookshelves. Clearly Besotted - Bookworm
Ink: Distress Ink: Walnut Stain, Fired Brick
Wood Veneer: Studio Calico - Hearts