Achievements

October 25, 2011

Papertrey Ink - October Blog Hop

Hello,


Today is Papertrey Ink's October Blog Hop.
<------ This photo is the inspiration this month.


When i saw it i knew exactly what i wanted to do........ it was just a question of whether it would come out like i pictured it. I really like the different orange patterns in the photo and wanted to make an actual pumpkin with different pattern papers.    I think it turned out pretty nice. :)


I started with an envelope, I wanted a card that i knew for sure fit in one. I used a ruler to get the measurements of the card and to know how high to make the stem. Once i had the measurements i made the cardbase out of rustic cream cardstock and rounded the corners. For the steam i sketched a steam free hand on scratch paper, with a few tweaks it was about as good as it was going to get :) I used it as a pattern and cut one one from brown paper. Then used a little bit of ink to make it weathered along with a little sandpaper for the edges

For the pumpkin i used a Halloween paper pad, this way all the patterns would match. I picked out a few of the best orange paper and played with the best order for the patterns to go in. When i was happy i cut them out ranging from 1 inch to 1.5 inch wide. I inked the edges of each stripe with orange ink.

Next i traced the cardbase on some plain white paper and cut it out. Then i used a strip of double sided tape across the middle of the white cardstock and adhered the paper stripes. I then trimmed off the extra at the top and bottom and adhered the steam to the back of the white cardstock. Next i used the sewing machine and sewed around the edge of the pumpkin. Once that was done i adhered the panel to my cardbase.


For the tag i stamped a leaf wreath in orange and stamped Happy Thanksgiving in brown. I added a little paper clip from Tim Holtz to one side of the tag. Next i wrapped twine around the steam and threaded it through the tag and tied it in a bow. The leafs are from the new PTI Christmas Poinsettia, while not technically pumpkin leafs i thought they looked good with the pumpkin and a good size for it. I used some markers to ink up the leafs and stamped them on the leaf die cuts, then adhered them to the bows center. Last i added a Tim Holtz stick pin and an orange rhinestone.


Have a great day!!

Dana

Supplies:
Stamps: Papertrey Ink: Christmas Poinsettia, 2009 Autumn Tags
Die: Papertrey Ink: Tag Sale #5, Christmas Poinsettia
Ink: Studio G
Markers: Memento
Pattern paper: Echo Park: Apothecary Emporium
Twine: http://www.etsy.com/shop/swanandshears
Embellishments: Time Holtz
Cardstock: Papertrey Ink: Rustic Cream

October 23, 2011

CAS-ual Fridays - Just Add Color

Hello,
Today i have a card for CAS-ual Friday's challenge, Just Add Color, to any image. I colored a snowflake after stamping it in brown ink on a circle. To the snowflake center i added a green metal embellishment. Below this i stamped the sentiment Let It Snow in brown ink, and cut triangle out of each end.

For the cardbase i made the bottom half with transparency. I stamped a small snowflake with versamark and embossed them with sparkle embossing powder. I used a PTI die to cut the transparency out and it has a nice wave shape to it. I added glitter pattern paper to the top of the card and adhered the snowflake with pop up dots.


This pic below shows the nice wave to the edge.


Thanks for stopping by!!

Dana

Supplies:
Stamps: Papertrey Ink: Tiny Treats: Christmas, Tremendous Treats: Christmas
Dies: Papertrey Ink: In the Meadow. Spellbinders: Circle
Pattern Paper: My Minds Eye
Ink: Studio G
Embellishment: Joanns
Embossing Powder: Joann's: Kaleidoscope

October 22, 2011

Make it Monday - Layered Mats & Frames

Hello!

Today i have a card for PTI's Make It Monday. This week challenge is to use dies to make layered mats or frames. Since Christmas is getting ever closer, i made a Christmas card! :)

I started with the button card die and cut rustic cream and some red from my scrap bin. I used the square die from the button die set. Next i stamped  the cute little Santa in the window. Then i colored him with watercolors and added glitter to his had and stars.


Above the window i added some patten paper tape. I adhered the red layer over the Santa with pop up dots and added ribbon at the top.


For my card base i drew diagonal lines with a pencil, then went over the lines with red Stickles. Then i used the half and half die and stamped ho ho ho in red ink, i also inked the edges with red ink. I adhered this strip over the glitter lines and adhered my tag on pop up dots.

Have a great weekend!!

Dana

Supplies:
Stamps: Papertrey Ink: Tiny Treats: Christmas
Dies: Papertrey Ink: Button Card, Half & Half
Glitter glue: Stickles
Ink: Ranger: Distress Red Brick. Studio G: Black
Paper Tape & Kraft Cardstock: The Paper Studio
Cardstock: Papertrey Ink: Rustic Cream and misc. scraps

October 17, 2011

Casual Friday - Orange you Ready to Trick or Treat?

Hello,

Today i have a card for this weeks Casual Friday's challenge. The challenge was to make a Halloween card... BUT you can;t use orange. Not even a speck!! This was hard for me, as orange is my favorite color and Halloween is my favorite holiday because of all the lovely orangeness!!


For this card i started with a spider web pattern paper and added a little bit of stickles to the center of the spiders web. Then i wrapped some black and white twine and made my own spider web.


Then i stamped a little spider from the twins web center. I stamped him again, cutting him again and adding him to the card front with pop up dots.

To the web center i added a tiny tag with a black brad. For the tag i stamped the sentiment Creeping by to Say Hi!

Thanks for stopping by!!

Dana

Supplies
Stamps: Spider: Stampendous
Pattern paper: Unknown
Kraft cardstock: The Paper Studio
Twine: My Minds Eye
Die: Spellbinders: Tiny Tags

October 12, 2011

Birdy Birthday

Hello,

Today i have card i made back in June for a good friend and coworker. She loves birds so i made bird card and a bird ornament all in one.


I started with her favorite paper from Basic Grey, trimming it about 1/4 short of the cardbase. At the bottom i added big scallops, then i layered (starting at the bottom) with a jute ribbon, white ruffle ribbon and twine wrapped around it all and tied in a bow at the left. I threaded a tag in the twine. The tag has happy birthday and a small tiny bird, and the edges are inked. Then i added a flower embellishment to the middle of the bow.


Above the bow i wrapped white twill around the card. Then i sewed around a vintage inspired piece of pattern paper. To this i adhered a cut out of the bird, then adhered this to the card front.


To make the ornament i used a bird chipboard and traced it out on the pattern paper, inked the edges and adhered it to the bird chipboard. I did the same for the birds wing. Around the birds neck i wrapped the ruffle ribbon and twine. Added another flower embellishment to the twine bows center. To make it an ornament i made a loop with twine and adhered it to the back of the bird. Then i used scotch tape at the back of the card to hold it to the card.

Thanks for stopping by!

Dana

Supplies:
(you will have to forgive me but its been a few months, i'm doing to by memory:) )
Stamps: Papertrey Ink - i think the bird is from Grunge Me, can;t remember what it set.
Ribbon: Hobby Lobby
Pattern Paper: Basic Grey
Flower embellishment: Martha Stewart
Twine: http://www.etsy.com/shop/swanandshears

October 5, 2011

Papertrey Ink - Make It Monday's - Stamped Washi Tape

Hi,

Today i have a card for PTI's Make it Monday. The technique this week is handmade stamped washi tape. I have been wanting to try washi tape, but didn;t want to pay shipping for a roll or two. So being able to make my own is awesome!! I know i will be doing this again!

First i don;t have score tape so i used  a sticker maker, which worked perfect!! I stamped violet flowers in black ink on white tissue paper. Next i trimmed it to the width of my sticker maker and ran it through it.


Then i stamped the same violet flowers on purple cardstock with versamark ink. I added the faux washi tape across the card. I love how it wrinkles here and there, adding texture to the card.


I stamped thanks on a small tag and tucked it behind a purple glitter heart. I threaded the heart with white string and tied it in a bow. Last i adhered the heart to the card.

Have a great day!

Dana

Supplies:
Stamps: Papertrey Ink: Year of the Flowers Collects, Gracious Vases
Ink: Studio G, Versamark
Button: Unknown
Die: Tag: Spellbinders

October 4, 2011

CAS-ual Friday's - Feeling Loopy

Hi,

I have a card for CAS-ual Friday's Feeling Loopy challenge. I had no real plan when i sat down to make this card. I just knew i wanted to do a Christmas card, so i pulled out my holiday ribbon to start with. I found some great wide, wired ribbon and started playing with it.

The ribbon has these snow flake squares that i folded into a loop. I adhered the loops to black cardstock. Next i used some dark pattern paper and inked the edges with black ink. I stamped Tis the Season and embossed it in gold.

I don;t have any gold buttons, so i took a wood button and inked it with versamark. Then i embossed it with gold embossing powder. To get in the nooks and crannies i used a versamark pen and embossed the button again. Then i attached it to the cardstock with gold metallic thread.


I adhered the pattern paper over the black cardstock, leaving a black border above the ribbon. Then i adhered this all to the cardbase. Last i used my finger to plump up the ribbon loops.

Thanks for stopping by!

Dana

Supplies:
Stamps: Papertrey Ink: Signature Christmas
Pattern paper: Basic Grey
Embossing powder: Joann's gold powder
Button: Unknown
Ink: Versamark
Ribbon: Micheal's

October 2, 2011

Papertrey Ink's Make it Monday - Chipboard Accents

Hello,

Today i have a card for PTI's Make it Monday. The challenge was to use dies and thin cardboard (think cereal box). This is a great technique that i have used a time or two before. Today's card i used the mittens from Love Lives Here: Holiday.

First i cut out the mittens and glued about 4 layers together. For the top layer i stamped some snowflakes and added a touch of glitter to the snowflakes with stickles. Next i stamped the mitten cuffs in dark pink and added a little bit of twine to attach each mitten together.


Then i stamped the garland across the card along with some ornaments, stars and hearts. Next i added a strip of dark pink card stock with a dash border across the top. Then i stamped the sentiment in dark pink at the bottom right. Last i used the dash line in the set and extended it across the card.

Thanks for stopping by!!

Dana

Supplies:
Cardstock: Papertrey Ink: Rustic White
Stamps: Papertrey Ink: Love Lives Here: Holiday
Die: Papertrey Ink: Love Lives Here: Holida
Ink: Studio G, Ranger distress inks
Punch: Fiskars - Dash lines

October 1, 2011

World Card Making Day 2011

Hello!!

It's finally here!! Its going to be a super fun day, that after a little History test and a stop at Walmart i will be card making my buns off!!! I've set this post to go live while i take the test, then its back home to check out blogs and more blogs before heading to the craft room!!

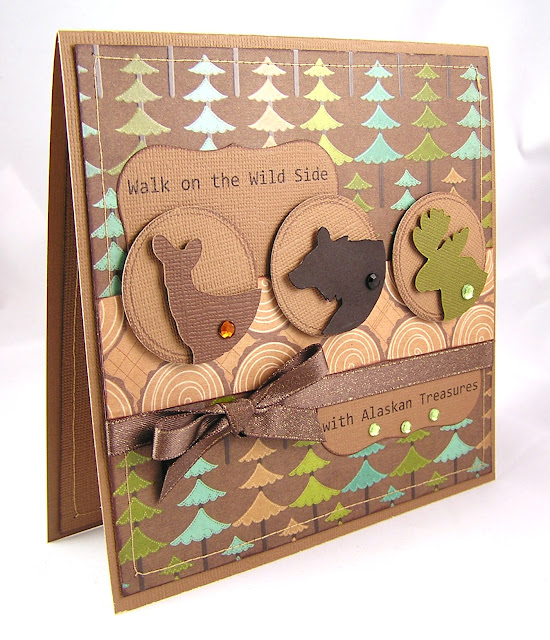
The card i have to share today, i actually made a few months ago for a coworker. Her mom was turning 50 AND going on an Alaskan cruise!! (FUN!!) So she wanted an Alaskan themed card for her mom... and boy it was a challenge! But in the end it turned out perfect as her mom loves bears!!

I layered some great tree pattern paper on brown card stock after sewing and inking the around the edge. I used the back of the same paper for a vertical strip across the card (the wood grain tree stumps).


Then i used my computer and printed out the sentiment 'Walk on the Wild side with Alaskan Treasuers' (it took me days to come up with the right sentiment !! :) ) I then split the sentiment in two and die cut each with a label die, placing the labels above and below the tree stump strip. Next i tied a brown sparkle ribbon in a bow below the pattern strip.


For the 3 animals i used a cricut cartridge for the moose and dear. But for the bear i googled a silhouette bear, printed him out then used the craft knife to cut him out. I added a gem to each animal and layered them on circles. Then adhered the circles over the pattern paper.

Happy World Making Card Day!!

Dana

Supplies:
Cardstock: Coredinations
Pattern paper: Not sure, i might have some, but i can;t find it right off the bat!
Cricut Cartridge: Give a Hoot
Gems: Unknown
Die: Spellbinders, Label and circle
Ribbon: American Crafts
Ink: Studio G