Achievements

July 17, 2012

Hampton Art - Christmas in July

Hi!

Today is my day at on the Hampton Art blog. We are celebrating Christmas in July, and i have card featuring Graphic 45 stamps. Their image stamps make for great coloring! For all the details and more pictures check out Hampton Art's blog!


And don't forget the Christmas in July giveaway! Check out this post for all the details!

Thanks for stopping by!

Dana

July 15, 2012

Sunday's Bits & Pieces #22


Hi there!

So i had a bunch of cards that i needed to get pics of, so out to the back yard with the cards, white poster board and my camera. I took about 30ish pics, got back in to download to my computer and guess what?!?! only 5 pictures!!!Yep!! Soooo found another card... and again same thing, so it looks like its time for a new camera! This one has lasted about 8 years, so it has had a nice run!!

I started to do some research, and there are a TON of cameras out there!! I used my moms camera for todays card, and know that i have to find something similar to what i have, her camera is only 5 optical zoom and i had a hard time really getting a close up of the strawberry's, i really wish it was closer. If you have any camera suggests, i'd love to hear them.... please!! :)

Now on the the card. I am linking this up to CAS-ual Friday's and this week challenge is strips. I had trouble sleeping friday, and sometime after midnight the idea popped in my head, use tiny strips of paper and die cut it.

CFC61

First i started with a double sided adhesive sheet. Next i went to my paper scraps and cut a bunch of tiny strips from pink/red and green scraps. Then i peeled one side of the adhesive sheet and randomly placed the pink strips all in a row on the sheet. I did the same with the green strips.


 Then i die cut the strips with a strawberry die, i also die cut 2 strawberry's and greenery from white cardstock. I used these to adhere my striped strawberrys to, it helped make the striped strawberry more stable. I did the same with the greenery, but you could just adhere it straight on top of the strawberry, but i liked the additional dimension the cardstock layer gave the greenery.


 Next i stamped sweet and birthday wishes on my cardbase. I adhered one strawberry to the card and the other with pop up dots!

Thanks for stopping by!!

Dana

Supplies

Stamps and Dies: Papertrey Ink: Strawberry Patch
Ink: Papertrey Ink: Autumn Rose, Dark Chocolate

July 12, 2012

Hampton Art - Christmas In July

Hi there!

Today is my day at Hampton Art and we are celebrating Christmas in July. My card features Hampton Art's Graphic 45 cling stamps! I have a little peek, to see the whole card and details click here.


Also make sure you are following along with Hampton Art's Blog this month for a change to win lots of Christmas goodies. See this post for details!

Happy Christmas in July!

Dana

July 8, 2012

Papertrey Ink: Make It Monday #73

Hi!

I have a card for this weeks Papertrey Ink Make it Monday. I made this card earlier this week and wanted to get it up soon after, but we had a garage sale and i got busy getting that ready and sweltering for 2 days, but it was worth it!! And because of the garage sale and plans i had today i wasn't able to get a Bits & Pieces card ready, but i'll have one next Sunday!!

This weeks Make it Monday is about stamping on pattern paper. I love stamping on pattern paper, so i used a new background stamp on my card. I used some Authentique pattern paper and white embossing powder with the background stamp.


Next i used some PTI dies and stamps for the sentiment. I also used a Rolodex die and cut out some flowers to go around the sentiment. I also used a little bit of white twill ribbon. Last i rounded the corners.


Thanks for stopping by!

Dana

Supplies:
Stamps: Papertrey Ink: Framed Out, Hero Arts: Background Stamp
Embossing Powder: Hampton Art
Dies: Papertrey Ink: Rolodex and Framed Out
Ink: Papertrey Ink: Ocean Tides
Pattern Paper: Authentique: The Gathering

July 1, 2012

Sunday's Bits & Pieces #21

Hello!!

*** WARNING**** Super long post!! ****** :)

So now that i've moved and have most of my craft stuff up and running i can start back to doing my weekly Bits & Pieces each Sunday. For anyone who doesn’t; know each Sunday (before the moving craziness!!) i would make a card just from paper scraps and/or extra embellishments. I have a ton of embellishments and do-dads that don’t make it onto cards, so i am doing this as a way to use that up!

Now my extra embellishment drawer had to get packed up, there is no room in my mom's craft room. So i just pulled a few sheets of scraps from each color and figured before long i would have plenty of extra embellishments to work with! And i did! I did a few cards this week and several elements and scraps went into my scrap bin.

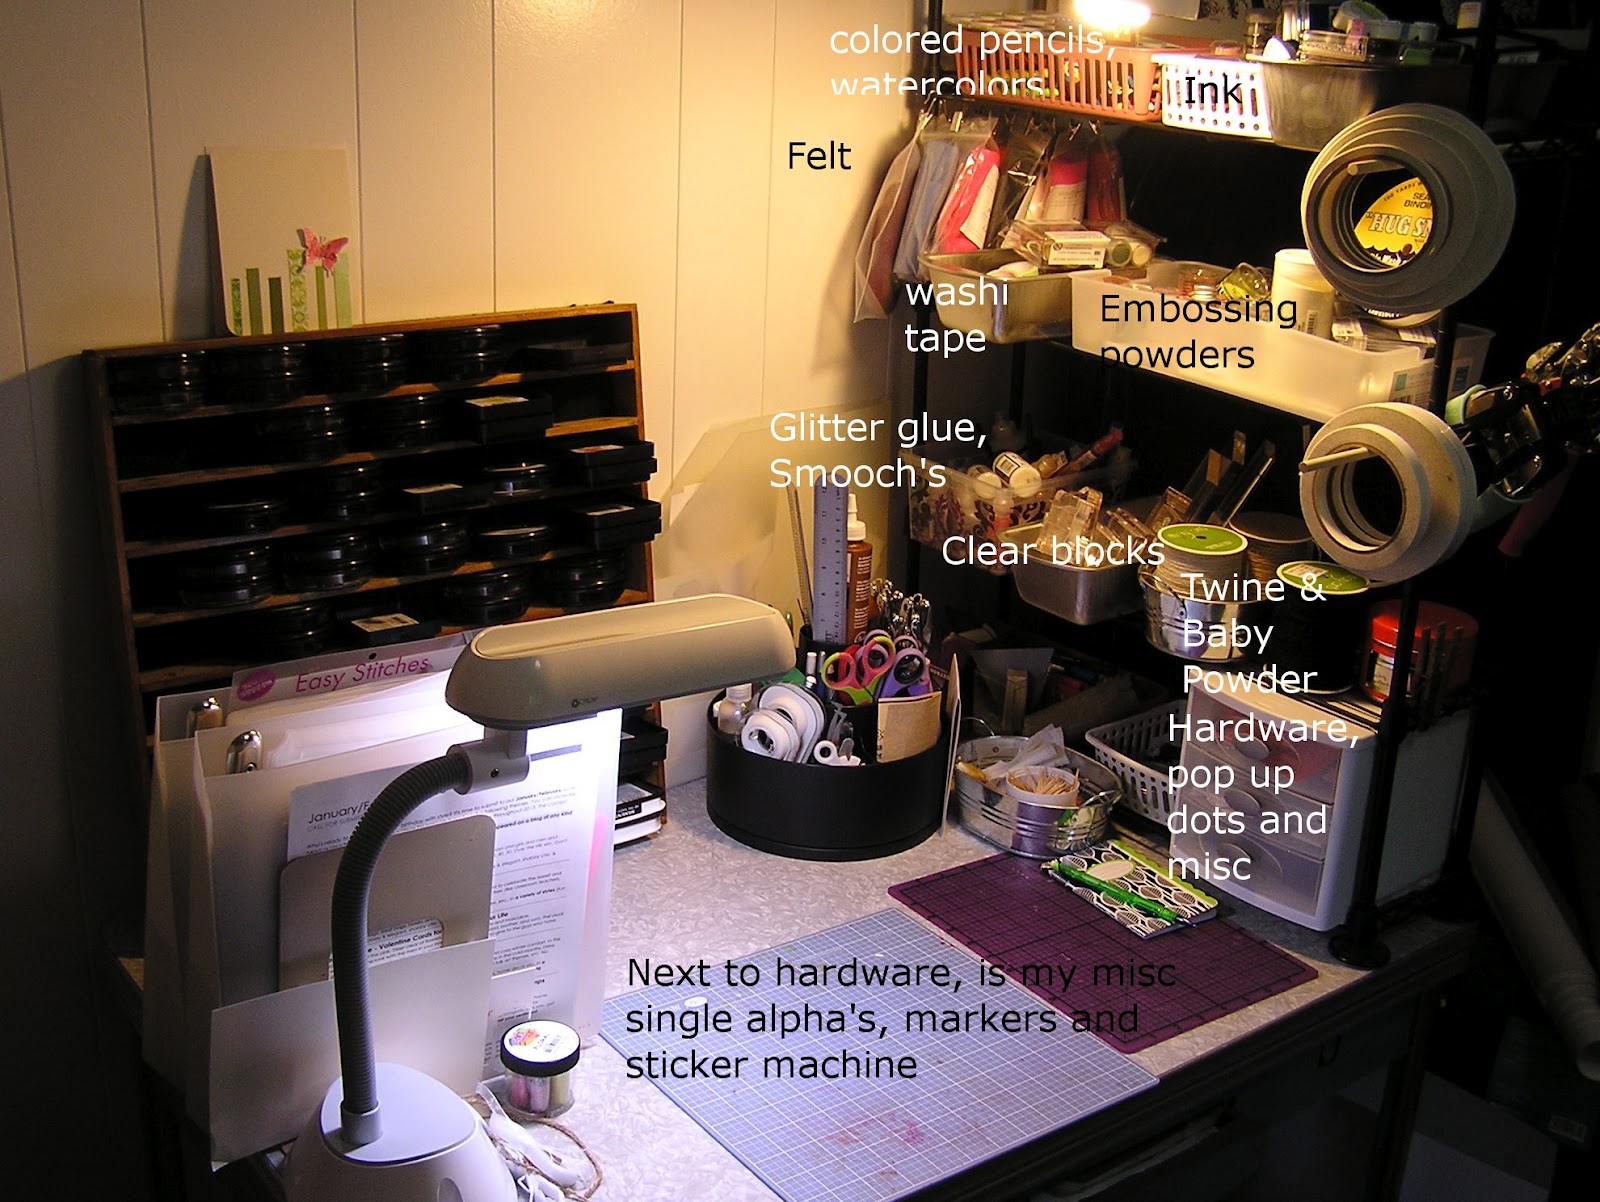
Before i show you my card, i thought i would show you my new crafting area. Sadly i didn’t take a picture before i moved, but let’s say it was a lot bigger, it was in nook in my bedroom and i had 2 desks, filing systems, shelves... lots of space!! But now that i have moved in with my mom to get my school done, space is limited.

First up is an overall pic (sorry about the lighting!! and spelling!! Didn't notice it when i was adding the text!) My mom found this awesome 50's kitchen table and took measurements and before i moved i had everything done just like you see it in TN, so i would know what i could get on the desk and what would have to be packed or staying in the car.


I have my PTI/Ranger Inks in a wood shelf (got it at a garage sale ages ago) I also have a lazy susan that holds all my tools and i have the majority of my dies in 2 binders. I got this storage idea here, and it works great for me, especially when space is limited!!

Next pic shows the storage i have under my desk. Originally this bin had all my cross stitch fabric, but that had to get packed away. So i found some storage bins at Target that fit inside each drawer, i can get 3 to a drawer, and each bin holds my clear and cling stamps that are stored in CD cases. The smaller bin has cardbases, envelops and stickers. On top of my stickers sits a small bin that has my scraps.


This next photo shows the rack better, it has a lot of stuff on it!! This is the stuff i use most when making cards, pop up dots, glitter glue, clear blocks, twine, adhesive tape... etc


Last i have a small shelf next to my desk that holds the solid cardstock and Kraft. Next to that are 2 crystal clear drawers that have brads, buttons flowers rhinestones etc by color. Originaly each color had a drawer, but since space is limited, i got 2 colors in each drawer. 3 other drawers are on the second and third shelf. On the top shelf sitting on the drawers is a 3 layer plastic case that has my Studio G pigment ink and PTI's ink refills.

I also have a bin for my punches and misc embellishments are scattered where they would fit. The last shelf (really the floor) has my box of Hampton Art goodies and next to that more bins that hold background stamps, big dies, and my alphabets.


Now this is not all of my stuff, i have at least 10 more 12 x 12 plastic holders that has all my pattern paper. Since i will not have much money to buy more supplies i want to use what i have so all my pattern paper is in my car (wagon, not a sedan). I also have several plastic shoe box like cases that have glitter, more cards and envelopes, small supply of fabric and all my 6x6 paper. I also store my ribbon in clear cookie jars, and those are in a couple boxes, also in my car. So when i need some glitter, ribbon or pattern paper, out to my car i go! When I’m done, it goes back out to my car!

Next up is today's card. So i do have some extra embellishments, not a lot, but i was able to make a cute card. I used some scrap paper, edged with white ink and added it to my cardbase.


I already had the flowers die cut that didn't get used on my earlier project. I had some stickles on one flower so i added it to the others. Then i found a strip of kraft, added some white dash lines and stamped the sentiment in white. I left the right end ragged.  Adhered the strip to the card and added the flowers with pop up dots!


LOL are you still with me!?!? Thanks so much for stopping by!!

Dana

Supplies:
Pattern Paper: American Crafts: Dear Lizzie: Neapolitan
Stamp: Happy Hydrangea
Ink: Papertrey Ink: White
Glitter Glue: Stickles: Straw
Pen: Gelly Roll: Sakura

June 30, 2012

CAS-ual Firday's Round and Round

Hiya!

I have a card for this week’s CAS-ual Friday's Challenge, Round and Round. You have to use 2 circles on your card, i used 2 ovals.... ovals are technically circles.. right?!?! hehe! Anyway when i saw the challenge i thought of the Happy Hydrangea set and knew it had an oval stamp and matching die and though i could come up with something!

cfc59

First i made my card base, then i tested my idea on scrap paper and when i had it down, i did it again on my cardbase. I die cut the oval from thin paper twice to use as masks. I stamped the front oval first then using a die cut oval masked it and stamped the flower image.


Next using masking i stamp the next oval, so it would be behind the first. Then using both die cuts i masked both ovals and stamped the individual flowers in the second oval.


Then i stamped the sentiment and last added a twine bow and tiny amounts of glitter glue to the hydrangea.

Hope everyone has a fun and safe holiday weekend!! Happy 4th!!

Dana

Supplies:
All are Papertrey Ink unless otherwise stated.
Ink: Royal Velvet, Winter Wisteria, Plum Pudding
Stamps: Happy Hydrangea
Die: Happy Hydrangea
Twine: May Arts
Glitter glue: Stickles: Diamond

June 27, 2012

CAS-ual Friday's and Moxie Fab

Hey there!!
Long time no see!! Well... not really that long, but it does feel like it!! My brother and I made the 10 hour trip from TN to MI with no problems, but after a week of intense packing, trailer loading, high emotions and not enough sleep i was exhausted!!! But it all eventually got done and i've had a few days to sleep in!! :)
After loading up the storage unit, unloading some of my craft stuff was next on my list! So the past couple of days I have been getting back into crafting and making cards.... and looking for a job of course!! :)

In fact i had some pics of my new very small craft space to share, but somehow they disappeared between the camera and the computer!! :) Luckily I have to keep my area clean so I’ll have to take some more today.
 
One of the cards I made is for this week's CAS-ual Friday's challenge. It's nice to get back to the challenges after having to forgo them the past couple of weeks. The challenge this week is to use pink on your card. I am also submitting this for Moxie Fab World Hello Challenge, as i was picking out the just the right butterfly i saw the hello, i though it would be a nice short sentiment for the card and perfect for the Moxie Fab challenge.

cfc58

 
I got my inspiration for my card from a roll of paper towel!! Yes, seriously paper towel!!! I went through about 3 rolls cleaning my just emptied apartment and one roll had these green lines (for grass) and a little bee, and as i was cleaning i was thinking, hmmm this would make a cute card!
 
To to make this idea fit my inspiration i used a poke-a-dot butterfly stamp. Instead of using ink i used a Smooch Spritz, it gave the butterfly a nice watercolor/vintagey look. It turned out really well, so i will definitely have to try this again!!

For the grass i trimmed some green pattern and solid paper and adhered it along my cardbase. I cut out the butterfly and stamped hello in brown ink and then adhered it to the card. Last i rounded the bottom corners.

A nice card to use up some scraps!! Thanks for stopping by!! Hopefully my camera will cooperate and I’ll have some pics of my crafting space tomorrow!!
 
Dana
Supplies:
Cardstock: Papertrey Ink: Rustic White
Stamps: Hampton Art: Curlicue Butterflies - Signature Collection - SC0395, Pattern Butterflies - Signature - Collection - SC0397
Other: Colorbox: Smooch Spritz: Pink Sprinkles
Various green pattern and cardstock papers.
<>
 
<>
 
<>