Hello!!
I'm stopping by with a just for fun card I made last weekend! It's for a2zScrapbooking's Monthly Challenge! The challenge is Anything Goes and you have to use a Hero Art product. This challenge is perfect because I've had some new HA stamps waiting to be used!
I started with Enjoy the Journey stamp set and stamped the bottle, then started stamping my scene with the ship and different elements in the set all inside the bottle. Off to the side, I stamped the cork and the Oh Ship! word bubble.
With my Spectrum Noir Illustrator Markers I colored the images, I used: AB1, AB3, CR11, EB1, EB2, EB4, EB7, GT1, IG2, MB1, MB2, and Blender. I used IG 2 to shade the sails and the blender to lighten it up a bit. I also used a light blue Spectrum Noir ColourBlend pencil for the back ground. It's super light, I just wanted a hint of color in the sky, but the photo light washed it out!
Next, I fussy cut out the bottle, sentiment, and cork. I added sentiment bubble and cork to the bottle with foam tape.
Then on some tourquoise-y colored card stock, I added a few rows of different Washi Tape, very easy but lots of impact. I picked up this Washi Tape at Micheals it's a cool mermaid theme set! Next, I added the bottle to the card with foam tape and last stamped the I Forgot Your Birthday below the bottle.
Thanks so much for stopping by!!
Dana
Supplies
Stamps: Hero Arts - Enjoy The Journey
Washi Tape: Recollections - Enchanting
Spectrum Noir Illustrator Markers
Spectrum Noir ColourBlend Pencils: Denim Blue
July 30, 2017
July 27, 2017
Coffee Loving Cardmakers - Texture
Hi!
This is my second post today, click here for my Art Impressions post! I'm also on the Coffee Loving Cardmakers blog today with some Texture ideas for your cards! I hope you'll stop by, here is a little sneak for you!!
This is my second post today, click here for my Art Impressions post! I'm also on the Coffee Loving Cardmakers blog today with some Texture ideas for your cards! I hope you'll stop by, here is a little sneak for you!!
Dana
Art Impressions Challenge #213 - I'll Text You
Hello!!
There's still a week left to play along with Art Impression Challenge #213. The challenge is called I'll Text You and the challenge is to use text only!!
For my card, I kept it some one simple!! It definitely helped that I had a MISTI!! So much that I had enough sentiments to make two cards!!
So I pulled a few colored card stock from my scrap bin and then pulled a ton of AI birthday stamp sets!! I can't find my list of sets used, but really just go to your AI stash and use as many as you can for this challenge!!
I stamped the sentiments on the scraps with watermark ink and then embossed them in white. The MISTI helped stamp multiple sentiments at once along with stamping them on different colored card stock too!
Then I just used some scissors and trimmed the sentiments into squares and rectangles. I pulled out two white card bases and started adhering the sentiments on the cards. Some hung over the edges and some didn't, I trimmed any that hung over.
Since my card fronts were all sentiments I decided to do a basic image on the inside of each card. So I stamped an AI cake and sentiment below. With my Spectrum Noir markers, I colored the cake, making sure my colors matched my colored cardstock! I just trimmed the stamped panel to a rectangle and adhered it to the inside of both cards!
Super easy and a great way to use up those scraps!! I hope you will play along with us at the Art Impressions challenge!!
Thanks for stopping by!!
Dana
July 26, 2017
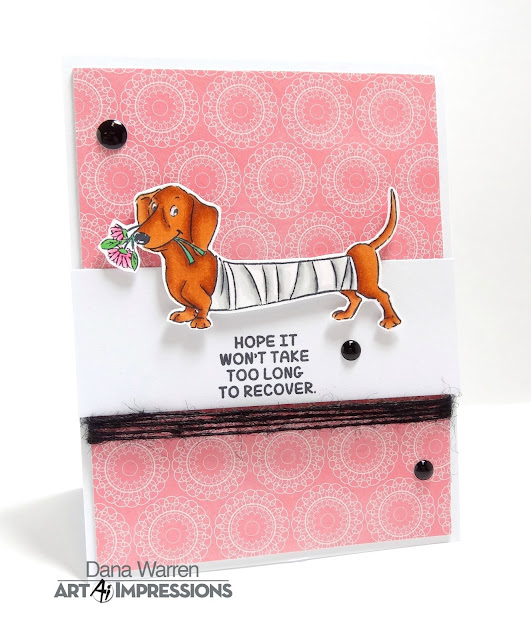
Too Long to Recover
Hello!!
I'm on the Art Impressions blog with a sweet and easy card featuring the new Doggy Kisses stamp set! Some times I just feel like coloring, so I usually pick a set, stamp all the images and color!! The hard part is getting around to making cards with all the images!! LOL!!!
This card was fast and easy because I already had the image colored, it was just about making a card layout for it. I colored the image with Spectrum Noir Markers: BP1, CR4, PP1, TN3, TN5, TN7. The image was fussy cut out with a little bit of a white border.
I used some pretty pink pattern paper for the background, trimming it about 1/4 smaller than the card base. Then I trimmed a wide strip of white card stock and stamped the Hope It Won't Take Too Long To Recover sentiment at the bottom middle.
Before adhering the pattern paper I wrapped black twine several times around the panel. I added the sentiment strip above the twine with double sided tape.
Next, I added the cute doggy to the card above the sentiment with foam tape. Last I scattered 3 black enamel dots around the card.
Thanks for stopping by!!
Dana
Supplies
Stamps: Art Impressions - Doggy Kisses
Spectrum Noir Markers
Pattern Paper: Pebbles - Garden Party
Enamel Dots
Twine: May Arts - Black
July 24, 2017
Word Dies & Masked Background
Hello!!
I'm sharing a card I made this weekend for Neat & Tangled Challenge - Masking. I have a few new stamps that I won and I finally got around to creating with them and today's card features one of those sets: N&T's Calathea.
The challenge is masking so I decided to do some masking with a sentiment die that I've had forever but only used the first time for this card! I cut the Thank You die many times from Simon Says Stamp Masking paper and then added them to a panel of watercolor cardstock.
I created the background in two main steps, after adding the masking thank yous I used Lindy's Stamp Gang Flat Fabio Ink spray's: Tears on My Pillow Tangerine. While that was drying I stamped 4 leafs from the Calathea set. Then I fussy cut out each of the leafs for later.
For the second background step I stamped the leafs many times over the masked thank you's I used many different inks for the multi stamped leafs. I inked each row several times, using my MISTI to make sure they stamped in the same place.
I removed the thank you masks and wrapped some black twine around the panel. Then I added 3 of the 4 leafs directly to the card, the 4th was added with foam tape. Over the weekend I played around with some Nuvo Crystal Drops, they were dry when I was making this card so I added a few of the best one's I made. To finish off the card I just added the panel to a card base.
Thanks for stopping by!!
Dana
Supplies
Stamps: Neat & Tangled - Calathea
Ink: Papertrey Ink - Ripe Avocado, Pine Feather, Simply Chartreuse, Spring Moss, New Leaf. Hero Arts - Forever Green, Field Greens, Green Hills.
Lindy's Stamp Gang - Tears on My Pillow Tangerine Ink Spray
Nuvo Crystal Drops - Pale Gold
Die: Heidi Swapp - Thank You
Masking Paper: Simon Says Stamp
July 19, 2017
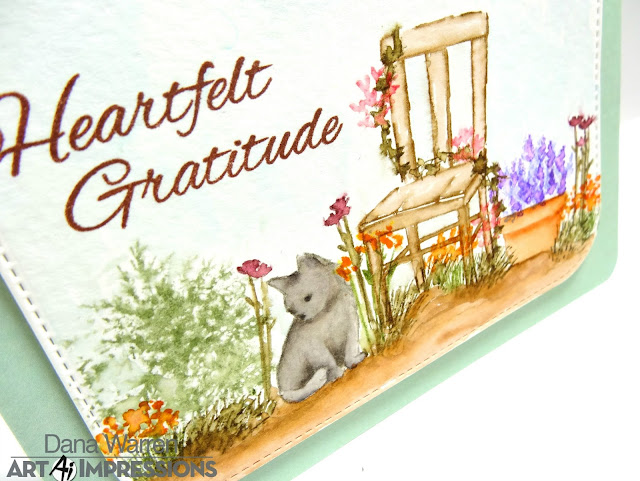
Heartfelt Gratitude
Hello!!
I'm on the Art Impressions blog today with a little watercolor scene I created with Wooden Chair Mini Set, WC Sentiments Set, WC Cats, and WC Flower Set 2, WC Foliage Set 1.
I started by stamping the chair and the flower pot, then the cat. To stamp and color, I used lots of Distress Markers, I'll list them out at the end.
To color the images I also scribbled the colors on a palette and used a paint brush to color the images. Going back over areas with more color to add depth and shading. As I stamped the flowers and foliage I used water and a paintbrush to get the watercolor look.
I added just a little bit of blue to background for a sky. Then I stamped the Heartfelt Gratitude stamp in brown ink. I cut the panel with a stitched rectangle. From my stash, I found some green paper and added it to a white card base. I added the stamped panel with foam tape and last rounded the corners of the card base.
Thanks for stopping by!! Happy Stamping!!
Distress Markers: Black Soot, Pumice Stone, Rusty Hinge, Gathered Twigs, Tea Dye, Bundled Sage, Worn Lipstick, Spiced Marmalade, Tumbled Glass, Aged Mahogany, Shaded Lilac, Peeled Paint, Forest Moss, Vintage Photo, Wilted Violet, Squeezed Lemon.
July 13, 2017
Coffee Loving Cardmakers - Inking
Hello!!
This is my second post today! Click here for my Art Impressions post! I am also on the Coffee Loving Cardmakers blog today with some Inking ideas! I hope you'll stop by, here is a little sneak for you!!
This is my second post today! Click here for my Art Impressions post! I am also on the Coffee Loving Cardmakers blog today with some Inking ideas! I hope you'll stop by, here is a little sneak for you!!
Art Impressions Challenge #212 - Bling, Glitter, or Glossy
Hi there!!
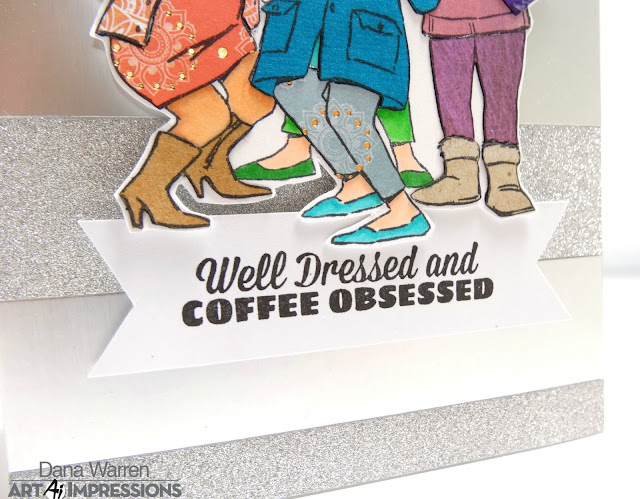
It's the second week of Art Impressions Challenge #212!! The challenge is to use some Glitter, Bling or something Glossy or all three!! I went with two of the three!! There are also 2 NEW Girlfriend stamps too!! My card features the Latte Love set!!
I started with my background using Crafter's Companion Luxury Cardstock Silver Pack and cuts stripes of the mirror and glitter card stock. The I adhered them to a white card base.
Next, I stamped the image and decided to do some paper piecing so I did some stamping on different pattern papers. I fussy cut out the different patterns, then I used Spectrum Noir Markers to color the skin, hair, shoes, and cups. I used AB1, AB2, AB3, AG1, AG3, AG5, BO2, BO3, CR8, EB5, EB6, FS2, FS3, FS6, FS8, FS9, GY1, GY2, IG1, IG2, IG4, IG10, PL2, PL5. I also used a couple Copic markers to get a different skin color: E13, E21.
When I was done coloring I added my fussy cuts and then fussy cut the whole image. I added the image to the card with foam tape. For a sentiment, stamped it on a strip of white cardstock and then notched each end.
Thanks so much for stopping by!!
Dana
Supplies
Stamps: Art Impressions - Latte Love
Pattern Paper: Recollections - Boho Bohemiem
Spectrum Noir Markers
Cardstock: Crafter's Companion - Silver Pack
July 12, 2017
Art Impressions Hoop Art
Hello!!
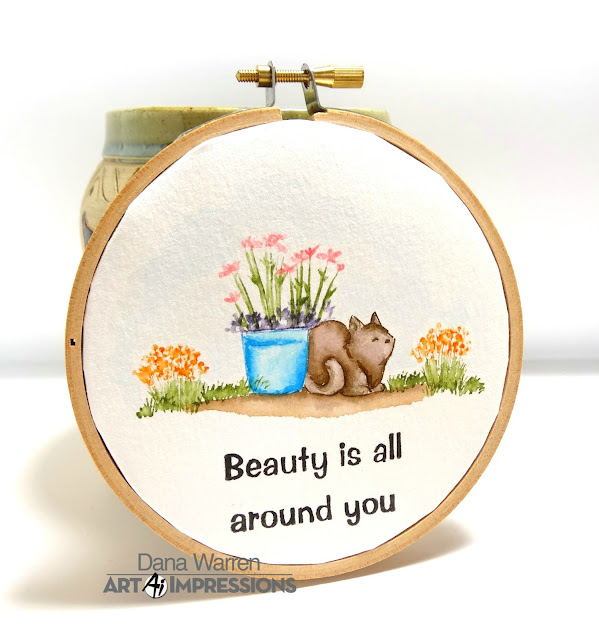
Are you a fan of Art Impressions Watercolor Stamps?? Today, I have a noncard idea!! Use your stamps to create some wall decor with an embroidery hoop!! It's super easy!!
I started with watercolor card stock and the following AI stamps: WC Sentiments, WC Cats, WC Small Containers, WC Flower. To color the stamps I used Distress Markers. I lost my list of markers I used, but you can see the colors I used in the photo and can customize them to fit your decor!
When I was stamping the cat and container I used AI's stamp positioner. As I stamped the images I would also scribble the marker ink on the palette, using a paintbrush and watercolor to add color and details.
Once everything was dry I placed the inside hoop around the image and lightly traced around the outside of it. Along with this line, I used a bone folder to crease a circle. It's not going to perfect as it's hard to crease in a circle!!! I worked the paper to bend the cardstock at the crease, all the way around the circle.
Next, I cut the paper around the circle leaving about 1/4 between the crease and edge. Then I made cuts all around the circle stopping at the crease. I added double sided tape to the outside of the inside hoop circle. I centered the image on top the hoop and pressed the tabs I cut onto the tape, working my way around the hoop, but also making sure the image stays centered in on the hoop. Last, I added the top hoop, tightening the screw at the top.
Now you have a pretty handmade decor to add to your wall or give as a gift!!
Thanks for stopping by!!
Dana
July 11, 2017
Crafter's Companion on HSN TODAY!
Hello!!
Crafter's Companion is on HSN TODAY!! Tons of great new products to check out!! Today, I'm sharing a card I made with Die'sire Classiques - Doily Corner die. This is just one of several different fancy corner die.
I started with a panel of watercolor cardstock and Spectrum Noir Aqua Markers. I pulled out a palette and one at a time scribbled the markers on it, spritz it with water and pressed the panel to the ink. I let each color dry, then added the next color on top. I used Orange, Scarlet, Magenta, and Evergreen.
When the panel was dry I die cut the corner dies in each corner creating a doily square. Then I added it to an aqua card.
From the aqua cardstock, I used the Happy Birthday circle dies from Sara Davies Signature Birthday Party Collection. I cut it again from black cardstock and adhered the aqua one on top. I also added a few rhinestones around the circle. Last, I just added it on top of the doily with foam tape.
Thanks for stopping by!!
Dana
July 7, 2017
Crafter's Companion on HSN July 11th
Hello!
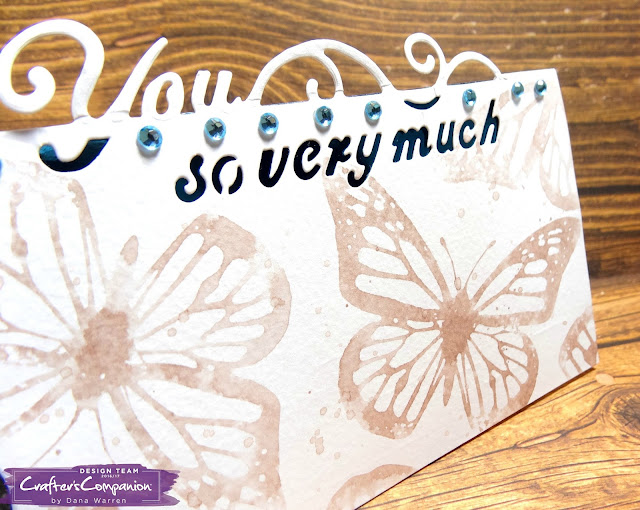
Crafter's Companion is on HSN next week with lots of great new products!! So get your credit card ready!! LOL!! Today, I'm showing a little peek of new Edgeable dies! These are really long dies, great for big cards or even scrapbooks pages. My card features the Thank You Very Much die.
I started with Crafter's Companion watercolor card stock and die cut the sentiment at the top, then folded it. To help the 'Very Much' part stand out I added some teal metallic cardstock under the front of the card.
Next, I colored a Sheena Douglass Monarch Butterfly stamp with a Spectrum Noir Aqua Marker, Slate. I also used the same color to add a few splatters. While that was drying I stamped another butterfly with the Black marker.
After the black butterfly was dry I used Rose Pink and Teal to color the butterfly, using the water to blend the two colors together. When it was all dry I fussy cut the butterfly out.
I added the butterfly to the card and then to add a little sparkle I found some light blue rhinestones that matched.
Thanks so much for stopping by!!
Dana
Supplies
Stamps: Crafter's Companion - Sheena Douglass Monarch Butterfly
Spectrum Noir Aqua Markers: Rose Pink, Teal, Slate, Black
Crafter's Companion Watercolor Cardstock
July 5, 2017
Udderly Mooovelous
Hello!!!
I'm on the Art Impressions blog featuring a card with the new Funny Farm clear stamps Udderly Fantastic! These new stamps are just hilarious and they have the perfect images to go with them!
I started by die cutting a stitched rectangle and stamped the cute cow with the coffee cup. Then I stamped the Udderly Moovelous sentiment at the top left corner. With my Spectrum Noir markers, I colored her up, using: EB1, EB5, EB6, FS6, FS8, GB8, IG4, TN1, True Black.
Next, I picked out some pattern paper and cut it with a stitched rectangle and then added it to a white card base. I cut two pattern paper strips and added them to the card.
Then I added the bossy cow panel to the card with foam tape. Last I added a few enamel dots and left it there!!
Thanks so much for stopping by!!
Dana
Supplies
Stamps: Art Impressions - Udderly Fantastic
Pattern Paper: Fancy Pants - Trend Setter
Dies: Gina Marie Designs - Stitched Rectagles
Subscribe to:
Comments (Atom)


