Achievements

September 29, 2020

PinkFresh Studio - Happy Birthday Rainbow

 Hello!!

Today I'm sharing a card I made for PinkFresh Studio September Challenge. I made this in the beginning of the month and then realized I have to get it submitted today!!! So I got to editing the photos!!! The challenge is rainbows!!


I started with Color Block Rainbow Die and cut it from masking paper. I placed the mask on a stitched rectangle panel. Then I used various inks from Catherine Pooler and Papertrey Ink to ink in each rainbow segment.


Next, I pulled out Make a Wish stamp set and matching die. I stamped and die cut several of the flowers and leaves from the set using the same inks from my rainbow. 

I pulled out a yellow card base and adhered my rainbow panel. From the Scripted Bold Sentiments 2 I pulled out the Happy Birthday and placed it on the panel. I played around with the sentiment and flowers until I liked the layout.

Then I stamped the sentiment and adhered the flowers with adhesive and foam tape. Last I added a few flat clear sequins. 

Thanks for stopping by!!

Dana

September 23, 2020

Graciellie Designs - Simply Blessed

 Hello!!

I'm popping in today with a card featuring Graciellie Designs newest digital stamp set, Simply Blessed! This gorgeous set is perfect for fall or really even time if you are so inclined!! 


I started my card by first opening the image in a Word document and resizing. I added the sentiment and printed it out. Then I pulled out Copics and colored the image. 

With a rectangle die I cut the image out, with the jar in the bottom left corner. With sharp scissors I fussy cut around the image and sentiment on the right side. 

For the background I used Wow Embossing Bonding Powder with a Hero Arts stencil and versamark ink. I used my heating gun to melt the powder. Then I placed the Wow foil, colored side on top over the melted powder. 

To have the foil stick to the melted powder I used an iron on the wrong side of the paper. This was the first time I've done this and it worked pretty well. I did miss, I think with the iron, the top part of the card, but over all you get a nice distress look as its not 100% perfect. Great way to use foil with out the a heating plate system.

I added the colored image with foam tape. I keep the left over sheet from my project to use on a future project. 

Thanks so much for stopping by!!

Dana

September 20, 2020

My Favorite Things Stamps - Innovation Master

 Hello!

This is my last card for My Favorite Things Stamps 2020 Card Design Superstar. It's for the Innovation Master category. Be warned it has a lot of pictures!!!

I wasn't planning on entering one for this, but Friday night after work I was trying to fall asleep, my mind was wondering and I started thinking about what I could do. Eventually I though about making an magnetic card with images that can me moved around and then can make their way to a fridge or other magnetic board. 

So I made a trip to Michael's yesterday and found some magnetic sheets and gave it try! I used MFT Jingle All The Way and stamped all the main images and then stamped the presents, reindeer and Christmas tree three times. 

The above card is the card I'm entering in the contest. But at the end I had so many images, that I made another card and I still had a few left over. So I figure I'll include a little bag with the extra's, that way a kid can play with a bunch of images. Oh, and as you can see the magnet images stay in place even when the card is standing.


The magnet sheets came rolled up, so while I was coloring and die cutting the images I put the sheets under my glass craft mat so they would flatten a little!

After a lot of coloring I trimmed a magnet sheet, so it was about 1/2 inch smaller then my card bases. I used foam tape to adhere the magnet panels to the card bases. 

For the images I used the image dies to cut the magnet sheets, then adhered each image to the matching magnetic cut. Next, I stamped two sentiments and then adhered them to the magnet sheet and trimmed them up.


The next photo's I moved the images around, so they are different from the images above!


Thanks so much for stopping by!! I hope you have a wonderful Sunday!!

Dana

September 19, 2020

My Favorite Things Stamps - Clean & Simple

 Hello!

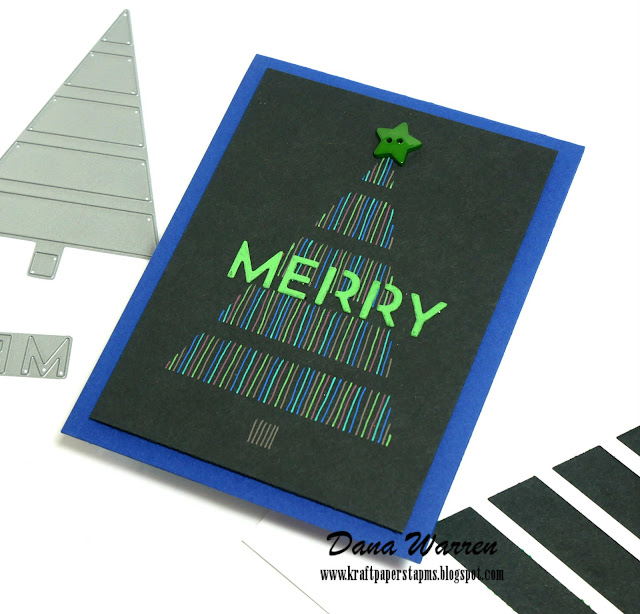
I'm back with my second card for My Favorite Things Stamps 2020 Card Design Superstar contest. This card is for the Clean & Simple category. And like my first card this one is a Christmas card, too.

For this card I use a very old MFT die called Christmas Tree Cutout. I started by cutting the tree out from some scratch white card stock to make a 'stencil.' In the photo I placed black card behind my die cut so it would be easier to see in the photos.

Next, I cut down a panel of black card stock so it would be about 1/4 inches smaller then my blue card base. I placed the 'stencil' over the panel and used some blue tape to keep it in place. Then I started adding vertical lines, inside each layer of the tree. 

I went with non traditional colors, more muted opaque gel pens, that show up really nice on black card stock. Starting with a line up of colors, I just went round and round threw my line up, working my way up each layer of the tree. For the trunk I used one of the colors that looks brown/grey.

Then I cut the Merry part of the die from black card stock and used one of the green gel pens to color the letters. When I do this I always color the edges, which was a little tricky with a gel pen! I did do two layers of the green to get good coverage. 

With a T-ruler, I adhered the Merry on top of the lined Christmas tree. From my stash I found the perfect green star button to add to the top of the Christmas tree. Last, I added the panel to the blue card base with foam tape!

Thanks so much for stopping by! I'll be stopping by tomorrow with my last card for the Card Design Superstar contest!

Dana


My Favorite Things Stamps - Coloring Virtuoso

 Hello!

Today, I'm sharing a card I made for the My Favorite Things Stamps - 2020 Card Design Superstar, Color Virtuoso. Instead of the usual coloring with alcohol and blending, I used stippling as my coloring. It's also called pointillism. I've been wanting to do something like this for awhile but when I saw the design contest, I thought it was time! I did pointillism way back in my high school art classes!

I pulled out all my MFT stamps and dies and was feeling Christmas-y, as all three cards for the contest are Christmas! For this card I went with Jingle All The Way.  I stamped one of the santas, little girl and presents.

For my stippling I used some fine point colored markers. When stippling, you randomly add the dots. The more dots go where its darker. I also mixed a couple of the colors together. Two browns for the ground and two skin colors. 

I added light blue dots for a sky and stamped Jingle All The Way above the images. Then I trimmed it down so it was about 1/4 smaller then my blue card base. 

Thanks so much for stopping by! I'll be back later tonight with my second card and then share my third card tomorrow!

Dana

September 6, 2020

Funky Fossil Designs - Masculine Birthday

 Hello!!

I'm popping in with a card I made for fun! Using a new stamp and stencil I picked up from Funky Fossil Designs! And of course I picked up more then just one stamp set and stencil!! Hehe!! 

I wanted to make an easy masculine birthday, so I pulled out the Blockade stencil and used it on a white card base. To ink up the stencil I used Catherine Poolers ink, blue, aqua and orange. 

Next, I used the navy blue to ink up the game controller and ear phones from the Gamer stamp set and then fussy cut them both out. I added them to the card with foam tape!

Last, I stamped the sentiment Level Up It's Your Birthday above the controller with black ink. Since its a masculine card, no enamel dots or sequins!! LOL!

Thanks so much for stopping by!!

Dana